Search This Blog

DC23 Clothing

DC23 Clothing
Find Us At Facebook
Showing posts with label Bakuc 2010 WIP. Show all posts

Tuesday, November 2, 2010

The Sazabi backpack and diorama...


... and yet I still have updates... hihi... I just finished painting the base color of the backpack earlier today and I also finished painting 8 1/72 figures for the diorama. I have glued the figures permanently already and have also weathered the dio further.

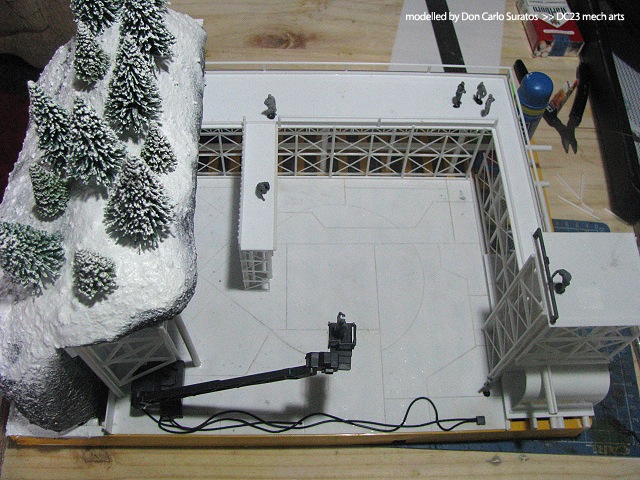
The photo on top shows my vain attempt to follow Kriz / Rmahza's suggestions to put some oil spills and rust effects on the main hangar floor. The surrounding snow are also dirtied up as I think melted snow ( water ) around the edges of the piles of snow will mix with the rust and dirt of the floor. The hangar is still in gloss coat though, but I will be putting the final semi-gloss / semi- matte topcoat once the Sazabi is in place.
Read more >>

Thursday, October 28, 2010

A glimpse of my MG Sazabi before weathering...


This post shows some of the parts assembled together and is ready for detail painting and weathering. Yes, I will do the decal work last, after the detail painting and weathering I will seal this with a nice gloss coat of future and then decal it.

I won't detail paint this kit much though, just a few hints of red and some koto parts painting. I do not want it to look like a huge white Christmas tree with small glittery detail painting of greens, blues and reds. I mean, too much detail painting with so much colors is not my type.

Lastly, I just want to keep a few archive photos of this build before weathering... because after weathering this kit might look worse and not as good as how it looks right now. Actually, I could always  just add decals and photoshop the photos and deemed it as finished, but I really want this one weathered.

I also decided against the camo pattern thingee, as I really like how my subtle shading turned out. I am afraid I do not have enough skills to add shading on the camo pattern and it might just ruin the shading of the white areas. Anyways here are a few photos of the build before weathering...
Read more >>

Wednesday, October 27, 2010

Snow Hangar diorama WIP summary


This hangar diorama has so much multiple posts scattered in this blog, I decided to put up a simple summarized version of the build. The build looks simpler and easier in this post and it is a lot more fun to see the progress in a single entry.

Now lets get through the build swifly with some old photos and descriptions of the build...

First, I constructed a hill with some styropor glued together, got a yellow plastic crate as the base, used some pla plates for the walls and floor and used some extra plastic materials like balloon sticks, M&M canisters and some pvc pipes.

My kids helped me apply some paper mache over the styropor hill... 
Read more >>

Tuesday, October 26, 2010

MG Sazabi WIP - airbrushed!


I primed the parts yesterday with Bosny grey primer as usual and let it cure overnight. I immediately painted the exo and vernier parts after waking up early today. I was also able to do dome post shading on the armor parts. However, I ran out of White paint!

I always hate it whenever I ran out of supplies in the middle of work... I painted the white parts with tan, then post shade with black, then I mist coat with flat white. The parts looks a bit grayish still, but I will get paints today and give this a lighter gray coat soon.

I also have to get a secondary color for the camo pattern. I think I will be done painting this by this week and I will be weathering this and putting decals by weekend. One more weekend before Bandai World Cup and I think I will finish on time. Anyways, here are a few photos of the white armor parts with subtle post shading...
Read more >>

Sunday, October 24, 2010

MG Sazabi almost ready for priming!


Decided to post a few photos of my MG Sazabi build today, I will add small pla plating strips and a few more details and this will definitely be good for priming by tomorrow. One more weekend to go before Bandai World Cup here in the Philippines and this is the first time during this build that I think I could make it to the deadline.

I want this weathered heavily as I've said before, even though I think judges like clean builds a little more ( personal opinion ). But I just want to please my self this time and not the judges... so if time permits, I will weather this mech much like my AC White Glint.

I also decided against painting this kit totally white because my diorama is soooo white already, so I bought a few jars of Tamiya paints yesterday. The color scheme will be a surprise until Bandai World Cup in the Philippines ( November 5 ).
Read more >>

Friday, October 22, 2010

Snow Hangar diorama painted - almost done!


 I managed to paint the diorama with spray cans yesterday. The only boo boo is that the base ( yellow plastic ) cannot be painted. I mean the paint won't adhere ( even the primer ) to the very glossy surface of the plastic. I will rough sand it soon and try to paint it flat black again.

After masking the trees and the snowy cliff, I sprayed the rest of the dio Bosny dark grey and the back of the mountain in flat black. I then applied more snow ( Talcum + future ) around some areas of the dio to blend it with the mountain.

Notice that most of the snow on the dio fell from the cliff and a tractor is kinda cleaning it up. I also applied some white panel lines and white dry brushing all over the place to give the whole hangar a more snowy look to it.

The rest of the photos was taken indoors in my work bench thus there is too much contrast. I will take better photos soon once I have added some posters, warning signs and maybe some hangar markings. Anyways, here are some photos of the almost complete snow hangar diorama...
Read more >>

Thursday, October 7, 2010

MG Sazabi a$$/ rear skirt update


Just a quick post before I go to work today. I have managed to worked on the rear skirt of my MG Saz for a couple of days now. I think I need to do more sanding and clean up before I could continue to detail this part further with MSG parts and pla plates.

However I am pretty happy with the results so far, considering I am not comfortable in scratch building. Adding the Quebley parts was a last minute decision and I thought of it coz my MG Quebley is obviously good for my stash without it's shoulders. Plus I really needed to give the scratch built rear skirt some round curves to match the front skirts and the Quebley shoulders.

I have here old photos of the scratch built rear skirt and some new progress pics of how it looks so far. I will add more details after cleaning up the edges of this part.
Read more >>

Monday, October 4, 2010

MG Sazabi VOB - wanabee backpack primed


Just sharing photos of my Sazabi VOB - wanabee backpack. I just primed it basically to check for errors and to see how it looks like so far. As expected, I was not able to remove the seam lines on the Zeta properly and there are a few glue marks to sand off as well.

However, I really like how it looks like right now, It looks a ton better primed than looking at it with all those assorted colors glued together. It looks more serious and looks a ton less funny and scrappy than when it was unprimed. Anyways, here are a few pics of the VOB - wanabee backpack...
Read more >>

MG Sazabi WIP update 100410 - backpack and some detailing


Good morning guys, we are off to my daughter's awarding ceremony at her school so I am blogging early today. As I've said in my previous post, here is a couple of days work done on the MG Sazabi ( while watching Glee ). hihi

I have made a simple attachment for the backpack, basically gluing it to the inverted original MG Sazabi backpack. I also managed to detail the Quebley binders ( highly inspired by Toymaker's Quebley ) and some simple mods on the torso and head parts. 

I will have to work and add a bit more to the torso area before moving on the the arms, legs, foot and the rear skirt. Anyways, here are some quick snapshots of my progress so far...
Read more >>

Saturday, October 2, 2010

Snow hangar diorama - 90 % complete!


Ello guys! just taking a break and updating you with my Bandai World Cup entry. My back is aching a bit, my eyes twitching and my hands a bit sore but I am pretty happy with my progress so far. I also do not visit Facebook and play with the games as much and I think I have the momentum to finish this dio today.

However, I will work with the MG Sazabi now and might revisit this diorama around 3rd week of October to see what improvements I could add to it. I ran out of 1mm square and round pla rods so I cut some strips from 3mm pla plates to finish the beams underneath the cat walks.

I will have to buy some supplies soon but for the mean time I think my diorama is 80% to 90 % done. Here are some pics...
Read more >>

Tuesday, September 28, 2010

snow hangar diorama - small update


I have here a few lousy snapshots of my snow hangar dio. Basically I added more railings and vertical beam supports to the cat walks and ( as Rmahza / Kriz ) suggested some more support on the carved out hillside to make it look more structurally possible in real life.

I still have to add a few more railings and beams in some areas to make it look busier and more convincing. I hope to paint this by weekend or at least move on to work with the MG Sazabi again by then. I think I will make it to the deadline, though I really need to cut my Facebook visits this October. Anyways, here are some pics...
Read more >>

Sunday, September 26, 2010

Detailing the Snow hangar dio...


I have been detailing and working with my MG Sazabi diorama since yesterday and I added cat walks as well which was not primarily in the plan. I realized due to long weeks without doing much Gunpla that I have slowed down considerably, and add the fact that I keep on taking breaks to play with dang Facebook games.

I managed a considerable amount of work on this dio yesterday and earlier today though. The cat walks in particular is a vain attempt to balance out the composition coz the hill with pine trees looks too heavy. Their is still a lot of amount of work to finish this as it is half the size of my last year's entry but I do not want it to have half the details. Anyways,  here are more photos of the progress so far...
Read more >>

Friday, September 24, 2010

Added some Trees for the snow hangar diorama


Ello guys just a quick small update of the snow dio for my MG Sazabi build. I bought some 1/100 and 1/200 pine trees at an art shop today. I also bought a 200ml tube of a Reeves acrylic titanium white paint. Did this with my daughters the minute I got home.

Basically I just drilled holes for the trees and my eldest daughter Nico inserted them with super glue. We then dry brushed some white paint all over the trees to easily simulate snow. I think it looks ok but I want more snow on the trees later. Anyways, here are some really quick and lousy snapshots of the dio with trees so far.
Read more >>

Monday, September 20, 2010

MG Sazabi WIP - Quebley shoulder panel lining


Ello guys, I just finished scribing random panel lines on the Quebley shoulders. I also permanently glued the shoulder mounts to the shoulder internals of the Sazabi, making the shoulders flare outwards a little more. Now the shoulders are farther away from the body and the kit looks even bigger / wider than before.

I also readjusted the GN-X parts flaring it upwards a bit more, coz it tends to limit the movement of the shoulders before. I also reshaped the yellow shoulder mounts with epoxy putty. I will need to wet sand the putty parts and the shoulder armors before pla plating them. Here are a few quick anapshots of the progress so far...
Read more >>

Friday, September 17, 2010

MG Sazabi WIP - more crotch and front skirt details


I almost finished the front skirt of the MG Sazabi I have been working on. The crotch part is almost done save some really small pla plating on a few areas. I ran out of 2mm pla plates when I did the diorama, thus I only made use of 1mm pla plates for the front skirt giving it lesser depth than what I originally intended.

I added small 1mm and 2mm round pla rods for detailing the crotch part thus giving it a more interesting look. I also beefed up the front skirt with epoxy putty as seen on the sides and also gave it some internal skirt detailing.

I am not really proud of the front skirt internal details are there are lots of mis aligned details and such. However, I did not bother to correct them coz the inner side of the front skirt won't be that visible anyways. I will try to beef up the sides of the front skirts further with 1mm pla plates. Anyways, here are a few photos of my small progress so far...
Read more >>

Sunday, September 12, 2010

Snow diorama painting test


After my kids has helped me with covering the hill side with newspaper mache... I then did some Tissue paper mache and applied my usual Sand+wood glue mixture. After letting the mache and the sand mixture dry overnight, I then tried to simulate snow with painting.

I do not want a white hill side, I want to show some rock formations on the side where snow would not build up. I used some cheap acrylics for the browns and painted the snow with Tamiya flat white enamel. I still have to apply talcum powder + glue OR talcum + future on the top of the hill to soften the rock ( pebble ) texture and simulate a thicker snow build up on top.

It looks ok but still needs a lot of touch up, but I think I could pull it off convincingly later on as I experiment with more snow and ice effects. I even plan to spray a mist coat of clear blue to the overall diorama once finished...I hope that will give a colder look to the dio.

Anyways, here are a few quick snapshots of my snow diorama so far...
Read more >>

Friday, September 10, 2010

MG Sazabi WIP - Quebley shoulders!


Ello guys, It's been a while ( 2 months ) since I worked on this project... I had it on hold as I was trying to finish my PG MKII build. However, I now decided to hold the MKII as I have to work on this already coz BANDAI World Cup is less than a couple of months away.

I even had to search my own blog to know how I name my Sazabi WIPS... is it Bakuc project or Sazabi WIP. Again, I will be joining the Expert Category for the first time this year... meaning I have ZERO chance of going back to the finals at HongKong. Thus, I thought that there is no point of just posting snippets of my progress and keep this project a secret.

I might not post progress photos once it is nearly finish as it will ruin the surprise factor though, but I would like to share this crazy kit bash idea I did a couple of nights ago while playing Castle Age in Facebook. The diorama is simpler this time thus unlike my " The Graveyard ", the diorama could never outshine the main kit.
Read more >>

Sunday, July 4, 2010

MG Sazabi WIP - Saz's new haircut


Ello guys, I managed to squeeze a couple of hours today after our " family day " earlier. I decided to give the Sazabi a new haircut  and a bit of initial detailing and also detailed the crotch area with a few MSG option parts and some usual pla plating.

I thought that giving the Saz a haircut and trimming off its original fin will give it a different look and also give the illusion that the body, boob part, crotch part and front skirts look bigger than they actually are. Same concept basically as the O having a small head relative to it's body.

I also added a couple of 5mm rods on the lower part of the crotch to flare up the front skirts. I detailed both the head and crotch with MSG option parts, a few pla plates and a few wires to give it the steam punk look I am after. A few more pla plating will be added on the head and the crotch to deem it as finished.
Read more >>

Wednesday, June 30, 2010

BAKUC project update - un-boobing the chest part


Ello guys, I skipped modding the head further today, coz I might get more ideas later on... plus I suddenly thought of sacrificing my 1/144 GN-X which has been waiting to be primed for 3 weeks now. I really am not into 144s I think.

I managed to mod and incorporate the GN-X parts into the chest and created an interesting looking part. The boob part suddenly does not look as booby anymore though I am veering away from Zluca's masterpiece. I think though that the chest blends a bit  well with the front skirts and the new head fin.

I have also started to detail up and thicken the front skirts using some 1mm and 2mm pla plates. I still have not sanded the edges of the skirts coz I might add a few more layers to the front and rear side of the front skirt. I think it is starting to look detailed now. Anyways, here are tons of pics on the progress of the build for the day...
Read more >>

BAKUC project quick update - initial head mods


Good morning guys, I did the head fin yesterday a couple of hours ago before work. I was not able to take photos though, coz my camera ran out of juice. I am pretty happy with the direction of the MG Sazabi mods so far. I personally think this is my best fin so far.

The fin is done by doing the basic shape with a .5mm pla plate, I then sandwiched the .5 mm with two 1.2 mm pla plates on both sides to give it a little more volume. For some weird reason I came up with the idea of cutting the tip of a Gundam foot and placed it on both sides also. The Force Impulse sword is another weird addition I think.

Most of my other large fin mods are simple 1 piece ( MG Kampfer, MG IJ and MG DOM ) fins with 0 to minimal detailing like the holes on the DOM fin. So I am really happy with this fin coz it is my most complicated so far.

This is the main reason why I love ZEON mechs and steam punk concepts in particular! Wild ideas and unorthodox modifications always look natural on them. Anyways, here are a few more pics of the fin... I will work on the MG Sazabi today and will have updates later...
Read more >>

Featured Post

Vallejo Mecha Color EXPLAINED

As usual, pardon for the selfies as I desperately try to get comfortable in front of the camera, for my new YouTube channel .  Le...

TOP POSTS