Search This Blog

DC23 Clothing

DC23 Clothing
Find Us At Facebook
Showing posts with label Zaku. Show all posts

Monday, December 2, 2019

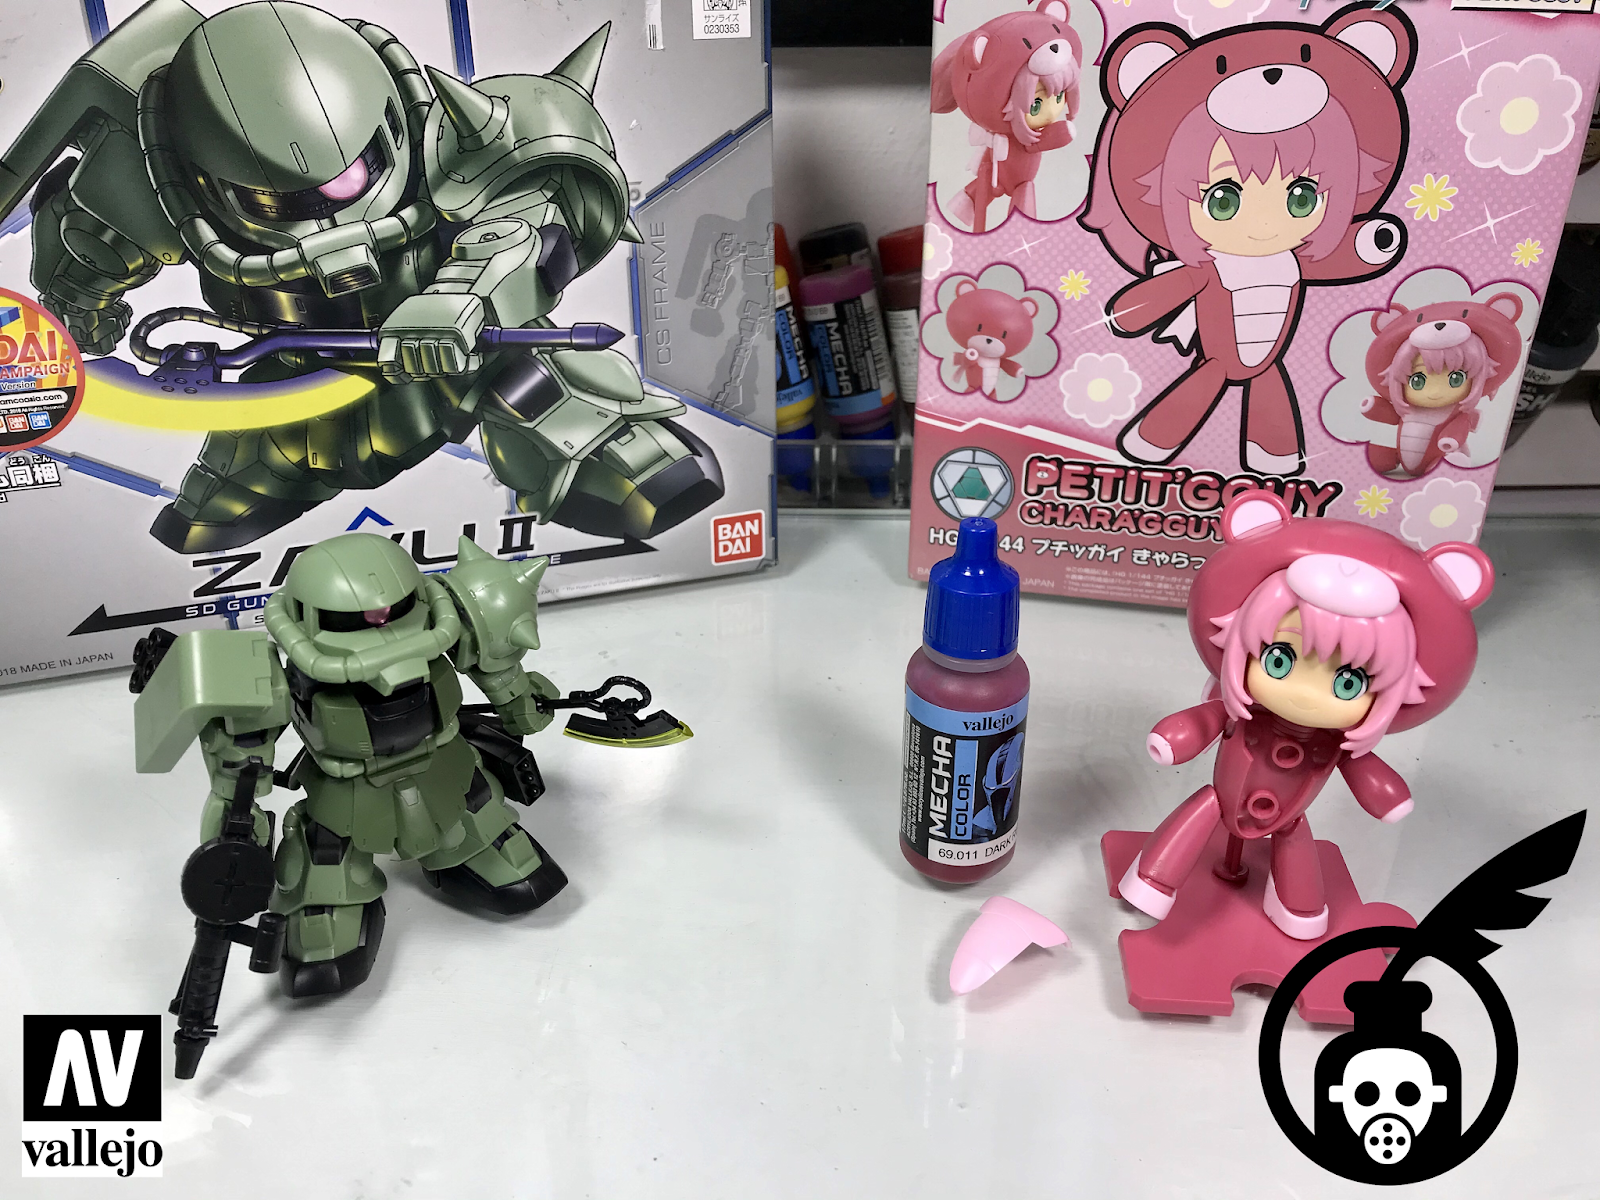
SD Zaku and Charagguy Momo snapfit


SD Zaku and Charagguy Momo snapfit Photo

I just finished snapfitting these two little Gunpla kits. Actually I applied thin cement on the seam line parts already while assembling. I will wait for the thin cement to fully cure until tomorrow, before sanding it off.

SD Zaku II

The SD Zaku is super nice. It has skeleton of sorts. It was a fun quick build. There are seamlines on the forearms, legs and skirts. I applied thin cement and letting it cure already.

However there are NO seam lines on the gun and bazooka. That was a surprise!

The black chest part, albeit seems hard to pull out is easy to remove. Very good for disassembly once I paint it. Hollow parts are not as obvious as previous SD models. The back of the hands and the missile pods are the only hollow areas of the kit. They are not visible at the front ( which is good, if you don't want to fill the hollow cavities ).

I might add a few rivets or holes here and there before painting. I will paint this SD Zaku with Vallejo Mecha Colors and will weather it like I normally do.

Can't wait for the thin cement to cure, so that I could clean up the nub marks and mold lines.

Charagguy Momo

This cute little pink kit is so... hmmm... cute!

There are no hollow cavities to fill except the ribbon at the back. Bandai also added a wide panel line across the head, so that you do not need to remove a hideous seam line. The hair piece at the back, the legs and the body have seam lines to fix tho. I have applied thin cement on them during assembly already.

Be careful with the pink ear parts and the pink chest part. Do not put them on if you plan to paint them separately. They are a pain to snapfit. Good luck to me if I can still remove the pink part of the ears.

I did not assemble the Beargguy / Petitgguy head, the Beargguy hand and the chair. I have no plans of painting them. I added the "eye" stickers just to see how cute it is. But I will hand paint the eyes during painting.

I plan to paint the onesie body with Silver Pink Vallejo Color Shift Color. This kit will be bling bling once finish. Will paint the hair parts, face, ribbon and eyes with Vallejo Mecha Colors.

That's it! 

That's it! As I've said, I will let the thin cement cure for a day, before sanding the seam lines off. Will also clean the nub marks and add a few rivets / holes on both kits.

Thanks as always for dropping by! Until next update guys!

Cheers!


SHOUTOUT as usual!

I only use Vallejo Acrylic paints in all my builds - Acrylicos Vallejo

I get some of my tools from HOBBYMATE Singapore - HobbyMate at Facebook

And get my Vallejo paints from Neutral Grounds Philippines - Neutral Grounds Philippines

I only use Harder & Steenbeck for airbrushing - Harder & Steenbeck Airbrush


SD Zaku and Charagguy Momo snapfit Photo

SD Zaku and Charagguy Momo snapfit Photo

SD Zaku and Charagguy Momo snapfit Photo

SD Zaku and Charagguy Momo snapfit Photo

SD Zaku and Charagguy Momo snapfit Photo

Read more >>

Tuesday, April 8, 2014

RG Zaku Diorama WIP040814


RG Zaku Diorama WIP photo

I thought my recent WIP post about this project would be my last post.

But I got a few suggestions from readers and a commenter that would improve the project. And because I love my readers and followers ( and their suggestions made so much sense ), I had to address them.

First off, I had to break the hangar extrusion at the left side of the diorama. A follower told me it is sticking out like a sore thumb. The angle was bad and it does not make much sense ( see how it looks like HERE ), so I broke it and cut it into half. Now it looks better overall. The hangar extrusion is blending with the theme a little better.

A friend veteran modeler PMed me about the rough texture of the diorama. I used the Vallejo Black Lava texture paint and it looks too rough for 1/144 scale. So I decided to paint over the old ground work and smoothen out the texture a little bit. I used Vallejo Brown Earth texture paint to reduce the profile of the ground work. Now it looks better on 1/144.

Lastly, a commenter suggested that I need to add more debris or weathering on the shield part as it looks too clean. Addressed that by painting over some Black lava paint. I will have to redo all the dry brushing and washes on these parts to blend them with the previous painted parts.

All the suggestions should help make the build look better once done. So thank you for the suggestions guys!

RG Zaku Diorama WIP photo

RG Zaku Diorama WIP photo
 RG Zaku Diorama WIP photo

RG Zaku Diorama WIP photo

RG Zaku Diorama WIP photo

I painted over some Water Effects paint earlier today... you need to let it dry for 24 hours, but I hope it looks better once I get home from work today. The Water Effects paint will dry into a transparent rubber-like surface. The diorama is shaping up already and I hope to finish it soon! Thanks as always for dropping by! Until next post guys! Just enjoy the hobby! :)


Read more >>

Monday, March 31, 2014

1/48 Zaku verDC23 WIP 033114

Zaku Diorama WIPphoto

Old habits die hard. And so I am slowly over detailing this project as usual.

I originally wanted a classic looking Zaku that does not look too customized. This is the same kit I am placing on a huge 1/48 Hangar Diorama. Obviously I am already obscuring the classic look of the Zaku.

I feel that the visor matches the round left shoulder armor and it should hopefully compliment the big crotch and skirts. This should give my Zaku that extra armor look without the need to kitbash 5 kits! ;)

I am going for a hyper detailed kit that wont look absurd and still resemble your classic green Zaku. No funny kit bashing super mecha monster ongoing here.

BTW, cutting 1/48 armor is hard! It is thicker than your usual MG armors but nothing my Hasegawa saws cannot handle. It has been a while since I customized a kit like so, I almost forgot how relaxing it is. 

Anyways, hope you like my update so far. Thanks for dropping by! Until next post guys! Just enjoy the hobby! :)

Zaku Diorama WIPphoto

Zaku Diorama WIPphoto

Zaku Diorama WIPphoto

Zaku Diorama WIPphoto


Read more >>

Sunday, March 30, 2014

34 Zaku Hangar Crews Assembled

Zaku Diorama WIPphoto

At last I have assembled all 34 1/48 crew members of my Mega Scale Zaku Hangar diorama. I have removed the mold lines already and will just need to fill the gaps around the neck and arm joints.

I am now pretty confident that this project will not only be my biggest diorama ever, it will also be the busiest! Unlike my other dioramas though, I hope to do a better job on painting all these figures. I think the main feature of the diorama are the figures as the Zaku will just be standing straight.

Zaku Diorama WIPphoto

Zaku Diorama WIPphoto

Zaku Diorama WIPphoto

The next couple of photos shows that I will not be using identical figures on this Zaku diorama. I wish I could make it sound complicated ( LOL ), but to be honest I just swapped the arms and heads to create different looking figures.

The two (2) photos below are showing the same figures that now looks different due to swapped parts. The upper torso and the leg parts remains the same though. Hopefully positioning them apart from each other in the diorama will not give away the fact that I am just using the same figs.

Zaku Diorama WIPphoto

Zaku Diorama WIPphoto

So far I have 34 figures I plan to use. However if I fail to pull off this custom made Char Aznable, I will obviously end up with 33. The char is basically one of the figures that I sort of sculpted. I gave him some boots and gloves by scraping off plastic and added the costume using Green Stuff. 

Char is still rough but once the Green Stuff has cured, I can refine the sculpt through sanding and shaving. I hope I can pull it off. :)

Zaku Diorama WIPphoto

Zaku Diorama WIPphoto

Assembling figures is fun! But kind of boring after 25 figs! I will set them aside as Char is still curing and now work on the 1/48 Zaku. I am going for a steam punk old school look to match the old school goggles of the crew members.

Wish me luck! Thanks for dropping by! Until next update guys! Just enjoy the hobby! :)

Zaku Diorama WIPphoto


Read more >>

Friday, March 28, 2014

Zaku Hangar Diorama Layout - Digital Sketches


Zaku Hangar Diorama Layout Digital Sketches Photo

I am still at work but I am so eager to work on my 1/48 Zaku hangar diorama already!

I can never do Gunpla in my office as it is too messy ( plastic dust and the smell of thin cement ). Although I have my own spacious cube, I can only display kits but never work on them. So I thought of drafting my Zaku hangar diorama in my computer. Actually I did some sketches in my notebook earlier today but I think my sketches are too rough to understand.

Zaku Hangar Diorama Layout Digital Sketch


Anyways, I was cracking my head the whole day for a layout that should look a bit unique. I understand that hangar dioramas are overplayed and so many has done good hangar dioramas already. I want a hangar diorama that is not too boxy like the traditional and classic layouts ( see this classic layout by Nathaniel Barrera circa 2005 ). I was even thinking of copying Ronnie Phoon's diorama which is sort of a reclamation of a broken down Zaku.

Reclamation dioramas will offer me creative ways for layout and placement and can have so many different settings ( desert, ocean, underwater, moon base ). But I always wanted a traditional basic hangar diorama for my display cabinet. No concepts whatsoever, just plain and traditional maintenance diorama for my 1/48 Zaku. So I ended up with the design and layout as seen on these photos.

Now I present to you my Quarter View Hangar Diorama! This Layout is basically your basic hangar diorama. The major difference is that the walls and the whole layout are tilted to the left side a bit. The main base for the diorama will be square as usual, but the walls will be angled to show a quarter view of the hangar cross section and of the main kit ( 1/48 Zaku ).

Hopefully this layout will create a different look for a traditional hangar diorama and should give more depth to the whole piece. Searching for creative ways for a hangar diorama for a couple of weeks now and I think my simple layout should look a bit different than what others have done in the past.

I will be filling it up with catwalks, ladders, cranes and bridges in the actual execution, but at least I now have a guide for the basic angles and layout of the my project.

I hope I did not waste your time with this post. I am just too excited to share my idea. Thanks as always for dropping by! Until next post guys! Just enjoy the hobby! :)

Zaku Hangar Diorama Layout Digital Sketches Photo

Zaku Hangar Diorama Layout Digital Sketches Photo

Zaku Hangar Diorama Layout Digital Sketches Photo

Read more >>

Thursday, March 27, 2014

1/48 Zaku Diorama " Resurrection " by Phoon


1/48 Zaku Diorama

 Modeling by Ronnie Phoon! Ronnie Phoon! Ronnie Phoon!

I am 200% sure that I will be having sleepless nights this weekend! I am so dang inspired right now after seeing the most impressive 1/48 Zaku diorama ever! What is most inspiring is that I personally know the alien ( the person ) that did this masterpiece!

I am so proud and delighted to present a work that most likely all of my readers have already seen ( I know I am late ). I am so guilty to steal all of the photos of this 1/48 Zaku Diorama " Resurrection " by Ronnie Phoon. Apparently Ronnie Phoon aka Phoon at Pla-Zone has been creating impressive masterpieces for the past few years. The last masterpiece that I knew Phoon created was the " Dawn of Change " which was almost his last update in his blog. As I have not visited forums for the past couple of years, little did I know that Phoon has become a monster in this hobby!

Although I stole all of his photos, do head out to Pla-Zone to check his original post. Link below


1/48 Zaku Diorama

1/48 Zaku Diorama

1/48 Zaku Diorama

1/48 Zaku Diorama

1/48 Zaku Diorama

1/48 Zaku Diorama

1/48 Zaku Diorama

Thanks for dropping by! Until next post guys! Just enjoy the hobby! :)
Read more >>

Tuesday, March 25, 2014

1/48 Zaku Hangar Diorama - Unboxing Again


1/48 Zaku Hangar Diorama verDC23 photo

This Zaku hangar diorama project is basically a dream project that I have shelved ( boxed ) for a loooong time. My very last post about this project was way back January of 2012 ( see post here ). So at least I have done the boring work of removing the seam lines ( albeit some are still visible ) and could jump into modifications and diorama construction already.In fact I have also constructed a wooden box for the hangar, but will redo it as I find it kind of too big for the kit.

I plan this to be my BIG side project as I still need to work on a few pending commission works this year. I plan to work with this from time to time and not on a regular " kill yourself " mode basis.

I think I am capable of modifying and painting the 1/48 figures this time around than years past. My short experience in painting miniatures ( see also this post ) will aid me in painting these little critters.I hope I can push myself to modify one of the figures to look like Char like in this diorama. If I cannot and my skills with green stuff will not allow me to do a Char figure, then fine! But I still want a really busy Zaku hangar diorama no matter what.

My last ( and only ) really complicated diorama was my " The Graveyard " diorama done back in 2009. I feel after looking at my Galleries ( 3 of them ), that I have regressed through the years and have not done really good projects before my self imposed retirement. So I think It is about time I push through with this dream project that I could show off in my display cabinet hopefully at the end of the year.

BTW, I have used some of these 1/48 figures in my The O II Hauer project. These figures are so fun to paint and as I've said I think I will do a better job this time because of my experience in painting miniatures. Basically I have 26 1/48 figures to use in this project. I think the number of figures will be enough to make it look really busy!

Anyways below are more photos of my materials for this 1/48 Zaku hangar diorama project.

1/48 Zaku Hangar Diorama verDC23 photo

1/48 Zaku Hangar Diorama verDC23 photo

1/48 Zaku Hangar Diorama verDC23 photo

1/48 Zaku Hangar Diorama verDC23 photo

1/48 Zaku Hangar Diorama verDC23 photo

1/48 Zaku Hangar Diorama verDC23 photo

1/48 Zaku Hangar Diorama verDC23 photo

1/48 Zaku Hangar Diorama verDC23 photo

1/48 Zaku Hangar Diorama verDC23 photo

1/48 Zaku Hangar Diorama verDC23 photo
Read more >>

Featured Post

Vallejo Mecha Color EXPLAINED

As usual, pardon for the selfies as I desperately try to get comfortable in front of the camera, for my new YouTube channel .  Le...

TOP POSTS