Search This Blog

DC23 Clothing

DC23 Clothing
Find Us At Facebook
Showing posts with label snapfits. Show all posts

Tuesday, December 3, 2019

RG Sazabi Snapfit and Quick Review


RG Sazabi photo

I asked my daughter ( @verashley05 ) to snapfit this Real Grade Sazabi for me earlier today. I initially thought of putting up a review of this kit at my Youtube channel, but then I decided I will just do a modification and painting video instead. We have Dalong and a ton of youtubers who reviews ootb kits already. 

FIRST IMPRESSION

I love RG! I love RG! I love RG! Bandai Real Grades, even the older ones are so nice and detailed for their size. Actually they are nice and detailed even in comparison to a few MGs. This kit is just a little more than 7 inches tall. The size is perfect for a nice diorama setting. 

I have zero plans on creating a diorama for this as of this writing tho. Maybe a nice little base, but I have zero diorama ideas so far. 

DETAILING 

I love details. I love detailing both my dioramas and my drawings. Detail is my middle name. I love the peeking grey parts. The exposed internals on some of the armor parts. I feel it needs more panel lines. More panel lines will be awesome for more two tone armor painting. I will add a few panel lines to help my two tone painting later and maybe a few of my usual armor trimming too. . I will also add my usual holes. No pla plating for me, as I will focus on painting for this build. 

PAINTING

I will paint this kit with Vallejo Mecha Colors ( seen in the pics ). Will paint it reds ( and red oranges ), metallic Mecha color paints for the internals and will weather it too. Will weather with Vallejo Mecha Weathering paints. Should be fun. I will have a video of my whole painting process at my Youtube Channel

CONCLUSION

I am Excited to paint and weather this! I am excited to share my painting process in video. I am excited to do Gunpla again! 

Thanks as always for dropping by! 

Until next update guys! Cheers!


SHOUTOUT as usual!

I only use Vallejo Acrylic paints in all my builds - Acrylicos Vallejo

I get some of my tools from HOBBYMATE Singapore - HobbyMate at Facebook

And get my Vallejo paints from Neutral Grounds Philippines - Neutral Grounds Philippines

I only use Harder & Steenbeck for airbrushing - Harder & Steenbeck Airbrush


RG Sazabi photo

RG Sazabi photo

RG Sazabi photo

RG Sazabi photo

RG Sazabi photo

RG Sazabi photo

RG Sazabi photo

Read more >>

Monday, December 2, 2019

SD Zaku and Charagguy Momo snapfit


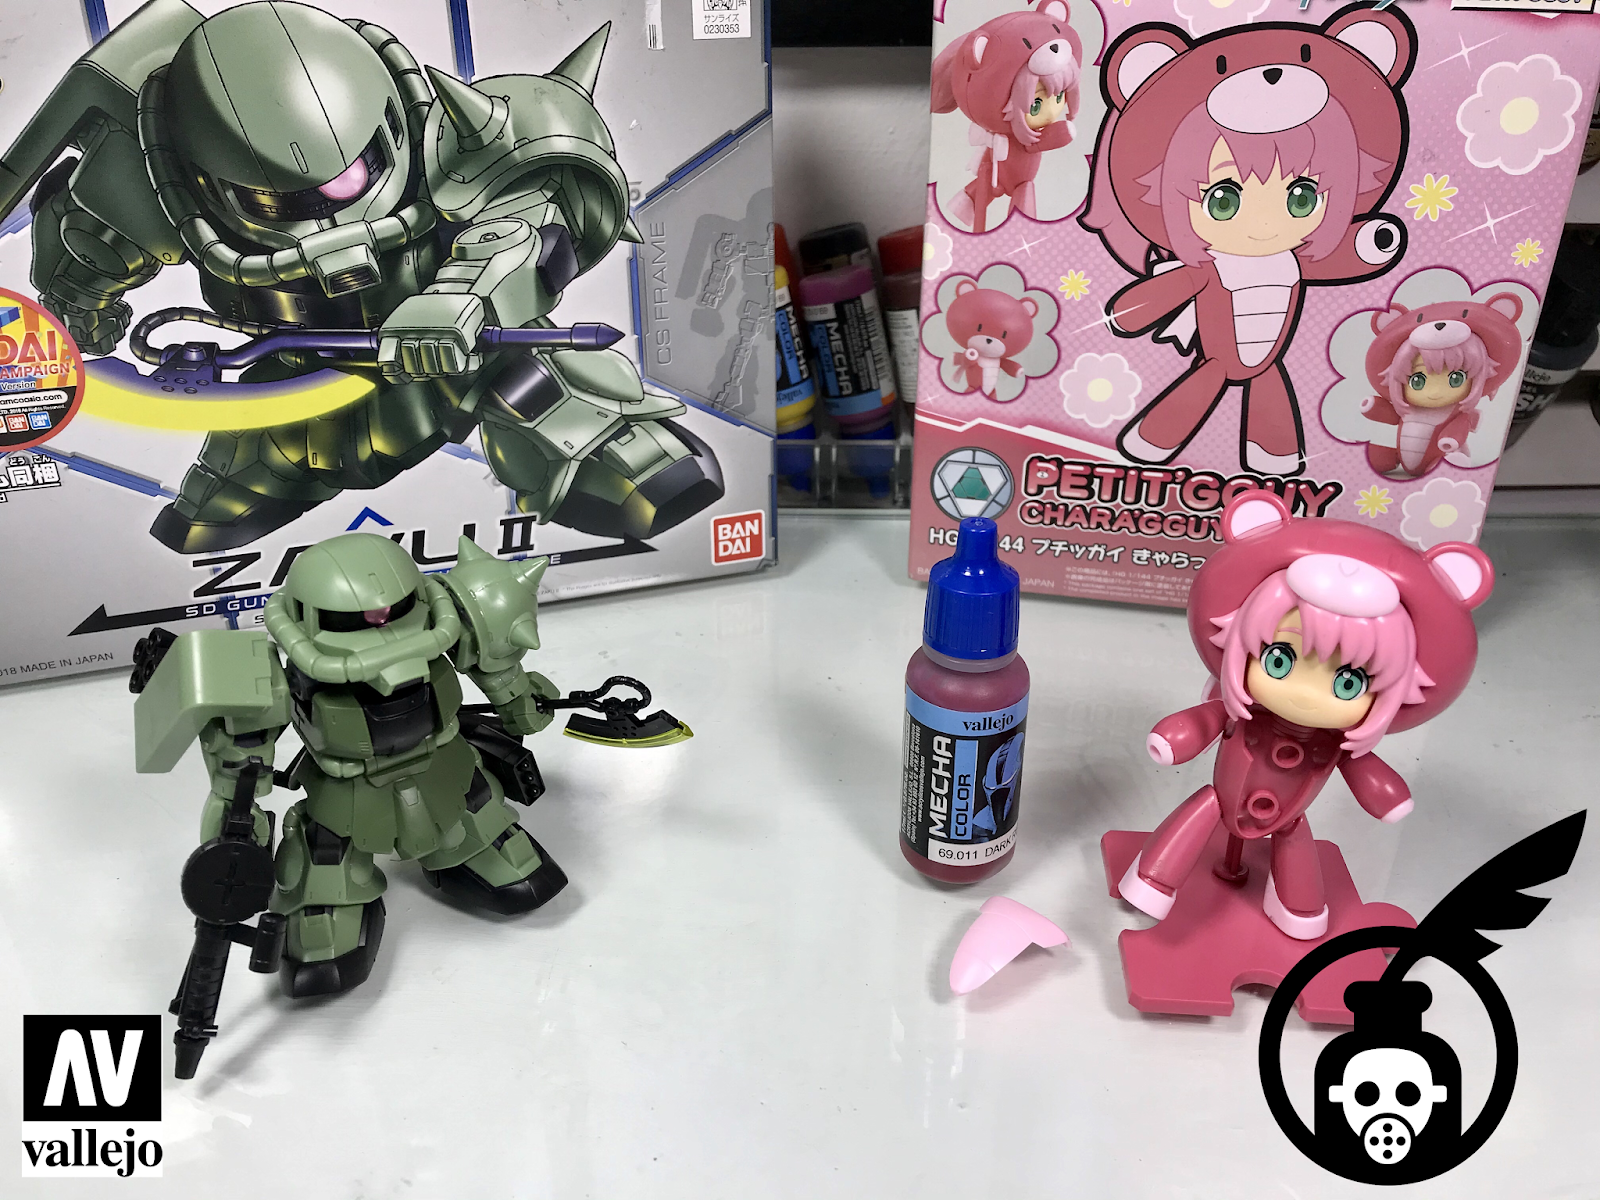
SD Zaku and Charagguy Momo snapfit Photo

I just finished snapfitting these two little Gunpla kits. Actually I applied thin cement on the seam line parts already while assembling. I will wait for the thin cement to fully cure until tomorrow, before sanding it off.

SD Zaku II

The SD Zaku is super nice. It has skeleton of sorts. It was a fun quick build. There are seamlines on the forearms, legs and skirts. I applied thin cement and letting it cure already.

However there are NO seam lines on the gun and bazooka. That was a surprise!

The black chest part, albeit seems hard to pull out is easy to remove. Very good for disassembly once I paint it. Hollow parts are not as obvious as previous SD models. The back of the hands and the missile pods are the only hollow areas of the kit. They are not visible at the front ( which is good, if you don't want to fill the hollow cavities ).

I might add a few rivets or holes here and there before painting. I will paint this SD Zaku with Vallejo Mecha Colors and will weather it like I normally do.

Can't wait for the thin cement to cure, so that I could clean up the nub marks and mold lines.

Charagguy Momo

This cute little pink kit is so... hmmm... cute!

There are no hollow cavities to fill except the ribbon at the back. Bandai also added a wide panel line across the head, so that you do not need to remove a hideous seam line. The hair piece at the back, the legs and the body have seam lines to fix tho. I have applied thin cement on them during assembly already.

Be careful with the pink ear parts and the pink chest part. Do not put them on if you plan to paint them separately. They are a pain to snapfit. Good luck to me if I can still remove the pink part of the ears.

I did not assemble the Beargguy / Petitgguy head, the Beargguy hand and the chair. I have no plans of painting them. I added the "eye" stickers just to see how cute it is. But I will hand paint the eyes during painting.

I plan to paint the onesie body with Silver Pink Vallejo Color Shift Color. This kit will be bling bling once finish. Will paint the hair parts, face, ribbon and eyes with Vallejo Mecha Colors.

That's it! 

That's it! As I've said, I will let the thin cement cure for a day, before sanding the seam lines off. Will also clean the nub marks and add a few rivets / holes on both kits.

Thanks as always for dropping by! Until next update guys!

Cheers!


SHOUTOUT as usual!

I only use Vallejo Acrylic paints in all my builds - Acrylicos Vallejo

I get some of my tools from HOBBYMATE Singapore - HobbyMate at Facebook

And get my Vallejo paints from Neutral Grounds Philippines - Neutral Grounds Philippines

I only use Harder & Steenbeck for airbrushing - Harder & Steenbeck Airbrush


SD Zaku and Charagguy Momo snapfit Photo

SD Zaku and Charagguy Momo snapfit Photo

SD Zaku and Charagguy Momo snapfit Photo

SD Zaku and Charagguy Momo snapfit Photo

SD Zaku and Charagguy Momo snapfit Photo

Read more >>

Monday, October 10, 2011

SD Kshatriya unboxing and snap fit


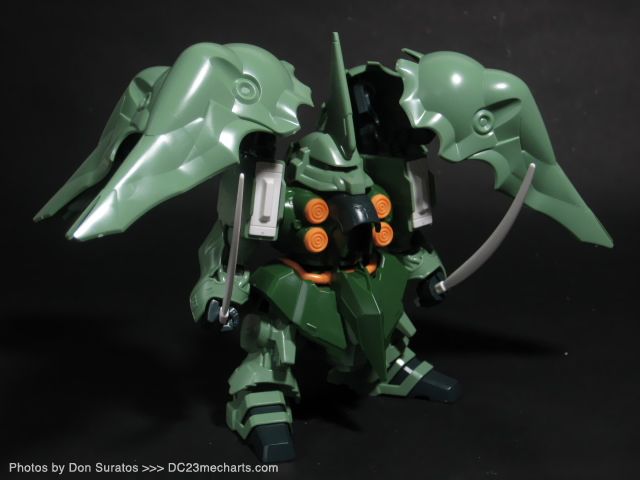
SD Kshatriya photo

I just finished ( sort of ) my MG Zeta commish and the base for the other MG Zeta commish earlier today, Thus I needed to snap fit something really quick and relaxing. I wanted to snap fit my RG Zaku but every time I open the box and see all those RG parts, I just can't get myself to do it. I know snap fitting a RG is far from relaxing. It's really fun, but it is so far from relaxing. lol

So I ended up unboxing and snap fitting my SD Kshatriya. It was a really quick straight forward build. No fancy small parts just big chunky one piece parts. It took me less than 30 minutes to build this and it was really fun taking photos of the little bugger.

As usual you need lots of detail painting OR stickers to make this SD look really good. The very reason why I almost never paint SDs are the detail painting and / or masking task ahead of you. I just collect them and wish someone with the skills and patience post them at MAC forums.

It has pretty much ALL the details of it's hguc counterpart, minus the color separation and some details underneath the wing binders. The kit should look great in the hands of other pro SD builders. Lots of open spaces that you could detail and mod. Their are only two hollow parts that you need to fill with epoxy putty, those are the hollow parts at the triceps and at the front of the foot.

The kit also came with this small 6 piece parts little GM looking tank or whatever. It is a cute little fellow that should be fun to paint and weather! The small additional robot made the purchase much more worth it. Never get this at shopping malls though as it will cost you a bomb. Try GreattoysOnline.com  at Greenhills or some other shops, other than the big toy stores.

The most important thing that I realized while building the kit is that the nubs are smaller than usual. I already have my sanding tool to clean up the nub marks as I build it, But I need not clean up the nub marks as they are so small and a snip from your art knife would clean it up already. Maybe Bandai has learned to make those nubs smaller so that nub marks are easier to clean up.

Overall this is an impressive SD kit! Buy it from better cheaper shops and not at huge toy stores in malls to get a better bargain. This is my second biggest SD kit so far ( behind only the SD dendrobium ) and hope Bandai produces a SD Sazabi of the same bulk and size.

SD Kshatriya photo

SD Kshatriya photo

SD Kshatriya photo

SD Kshatriya photo

SD Kshatriya photo

SD Kshatriya photo

SD Kshatriya photo

SD Kshatriya photo

SD Kshatriya photo

SD Kshatriya photo

SD Kshatriya photo

SD Kshatriya photo

SD Kshatriya photo

SD Kshatriya photo

SD Kshatriya photo

SD Kshatriya photo

SD Kshatriya photo

SD Kshatriya photo

SD Kshatriya photo

SD Kshatriya photo

SD Kshatriya photo

SD Kshatriya photo

SD Kshatriya photo

SD Kshatriya photo

SD Kshatriya photo

SD Kshatriya photo

SD Kshatriya photo

Thanks for dropping by Til' next post guys! :)


Read more >>

Monday, October 3, 2011

MG Zeta White Unicorn / Karaba snapfit


MG Zeta White Unicorn / Karaba Photo

Finally I was able to finish snap fitting this beautiful kit. I had to space away the snap fitting with my other MG Zeta commission work, so that the enthusiasm level on working on the same kit is the same. Meaning I made sure I almost forgot how to snap fit or assemble the other MG Zeta before I could actually snap fit this kit.

I have pretty much sanded off most of the visible nub marks already and have also cemented the seam lines along the wing parts and the rifle. The modifications on this kit is a bit simpler than the other MG Zeta, as I plan to not put so many pla plating on it. This MG Zeta build is focused on recreating the color scheme as seen on the box... my version of course. 

With its unique color scheme, this build should be as stunning as the other one ( hope so ). I like the kit so much but as this is a limited edition kit, I think I could not afford to personally get one for my collection. The white, light grey and pink color scheme is so nice to behold. However, most of the pink parts that should be in the kit are just plain old stickers.

I will also be modifying the huge base that came with the kit and make it a bit smaller but a bit more complicated. Once finished, the MG Zeta Karaba should have a wrecked hangar as base. Now here are a few photos of this stunning master grade...

MG Zeta White Unicorn / Karaba Photo

MG Zeta White Unicorn / Karaba Photo

MG Zeta White Unicorn / Karaba Photo

MG Zeta White Unicorn / Karaba Photo

MG Zeta White Unicorn / Karaba Photo

MG Zeta White Unicorn / Karaba Photo

MG Zeta White Unicorn / Karaba Photo

MG Zeta White Unicorn / Karaba Photo

MG Zeta White Unicorn / Karaba Photo

MG Zeta White Unicorn / Karaba Photo

MG Zeta White Unicorn / Karaba Photo

MG Zeta White Unicorn / Karaba Photo

MG Zeta White Unicorn / Karaba Photo

Thanks for dropping by! Til' next post guys! :)


Read more >>

Featured Post

Vallejo Mecha Color EXPLAINED

As usual, pardon for the selfies as I desperately try to get comfortable in front of the camera, for my new YouTube channel .  Le...

TOP POSTS