Search This Blog

DC23 Clothing

DC23 Clothing
Find Us At Facebook
Showing posts with label wip. Show all posts

Tuesday, December 3, 2019

RG Sazabi Snapfit and Quick Review


RG Sazabi photo

I asked my daughter ( @verashley05 ) to snapfit this Real Grade Sazabi for me earlier today. I initially thought of putting up a review of this kit at my Youtube channel, but then I decided I will just do a modification and painting video instead. We have Dalong and a ton of youtubers who reviews ootb kits already. 

FIRST IMPRESSION

I love RG! I love RG! I love RG! Bandai Real Grades, even the older ones are so nice and detailed for their size. Actually they are nice and detailed even in comparison to a few MGs. This kit is just a little more than 7 inches tall. The size is perfect for a nice diorama setting. 

I have zero plans on creating a diorama for this as of this writing tho. Maybe a nice little base, but I have zero diorama ideas so far. 

DETAILING 

I love details. I love detailing both my dioramas and my drawings. Detail is my middle name. I love the peeking grey parts. The exposed internals on some of the armor parts. I feel it needs more panel lines. More panel lines will be awesome for more two tone armor painting. I will add a few panel lines to help my two tone painting later and maybe a few of my usual armor trimming too. . I will also add my usual holes. No pla plating for me, as I will focus on painting for this build. 

PAINTING

I will paint this kit with Vallejo Mecha Colors ( seen in the pics ). Will paint it reds ( and red oranges ), metallic Mecha color paints for the internals and will weather it too. Will weather with Vallejo Mecha Weathering paints. Should be fun. I will have a video of my whole painting process at my Youtube Channel. 

CONCLUSION

I am Excited to paint and weather this! I am excited to share my painting process in video. I am excited to do Gunpla again! 

Thanks as always for dropping by! 

Until next update guys! Cheers!


SHOUTOUT as usual!

I only use Vallejo Acrylic paints in all my builds - Acrylicos Vallejo

I get some of my tools from HOBBYMATE Singapore - HobbyMate at Facebook

And get my Vallejo paints from Neutral Grounds Philippines - Neutral Grounds Philippines

I only use Harder & Steenbeck for airbrushing - Harder & Steenbeck Airbrush


RG Sazabi photo

RG Sazabi photo

RG Sazabi photo

RG Sazabi photo

RG Sazabi photo

RG Sazabi photo

RG Sazabi photo

Read more >>

Monday, March 16, 2015

Quick Warmachine Game Table verDC23


Warmachine Game Tablephoto

Just wanted this quick project archived here in my blog. This is a simple Warmachine / Hordes table mat / table for me and my kids. This is far from done as my son is requesting trees ( forests ), damaged houses and more details. Looking forward to adding modular obstruction pieces and forests from time to time.

I used to play with my 8 year old son on top of the dining table but after putting up this table a couple of weekends ago, me and my son are enjoying our games so much more! We play at least 2 back to back games in the mornings and 2 back to back games in the afternoon. Yesterday ( Sunday ), we even played a game before going to sleep.

I never realized that playing a tabletop game ( Warmachine / Hordes ) on top of a custom table, makes the game 10x more fun! Looking at the opposing army on top of a painted terrain makes the experience so much more exciting.

This post is not really a tutorial on how to make a custom Warmahordes table as this is too simple in the first place. But I do hope to inspire others that making a table mat is so simple and easy. I got three ( 3 ) 2feet x 4feet styropors, cut them to shape, glued ( wood glue ) some aquarium sand, painted with cheap acrylics, and sealed with polyurethane varnish... voila! super fun table that is relatively cheap!

Hope to add more details on the table once in a while and post some battle reports sometime soon. Thanks as always for dropping by! Until next post guys! :)

Warmachine Game Tablephoto

Warmachine Game Tablephoto

Warmachine Game Tablephoto

Warmachine Game Tablephoto

Warmachine Game Tablephoto

Warmachine Game Tablephoto

Warmachine Game Tablephoto

Warmachine Game Tablephoto

Warmachine Game Tablephoto
Read more >>

Tuesday, February 17, 2015

The Noob Way Of How To Paint Miniatures


The Noob Way Of How To Paint  Miniaturesphoto


I am so shy to tag this as a tutorial, much more put it up with a banner on my tutorial page, I do hope a younger miniature or a less experienced miniature painter finds this helpful though.

My very first painted miniature was back in 2012. I painted a Trollbloods Madrak Ironhide metal model from Privateer Press. I got hooked painting minis back then, until I eventually went into hobby hiatus. I am starting to enjoy painting Privateer Press miniatures again these days. Although I still mainly work on my Gundam commissioned works and I plan to join GBWC 2015 at the end of the year, I really find hand painting minis so much more relaxing.

I just want to share how I paint my minis.

1. Zenithal Priming

I start by priming them and doing Zenithal White painting that would serve as my base coat. The Zenithal painting exaggerates the shadows and highlights of the model. I shoot 90 degrees on top of the model with white paint. This technique brings out the details of the model effortlessly. 

The Noob Way Of How To Paint  Miniaturesphoto

2. Black Ink Wash

I use Black Game Ink highly diluted with Glaze Medium. The wash further brings out the details of the model. The Glaze Medium helps increase the flow of the ink and will flow through the crevices of the details of the model. Now you are ready to paint the base colors.

The Noob Way Of How To Paint  Miniaturesphoto

3. Paint the Base Colors

I am still learning on how to blend colors in hand painting. I used to use distilled water in thing my paints. I now know that mediums are way better than distilled water in thinning paints. Distilled water will expand and weaken the binder once dry. The paint will dry a bit more brittle than desired. Mediums are basically the same components as the paint minus the colored pigments. It will keep the elasticity of the paint and will not weaken the cured paint. Chemistry aside, using mediums for blending is like magic! It dries a bit slower than using distilled water thus you could do wet to wet technique a lot easier.

I also hand paint a thin layer of Retarder Medium over the model before painting the base color. The retarder will further retard the drying time and wait until you paint the highlights or lighter colors and shadows.

The Noob Way Of How To Paint  Miniaturesphoto

4. Paint the Details and Highlights

The photo below does not show the highlights and details yet. I shot a Matt Coat over the model to see how the main colors are blending. I will try to finish this model tonight and will update this blog post. :)

The Noob Way Of How To Paint  Miniaturesphoto

I also sometimes shoot the main color of the model with an airbrush. This is the quickest way to paint the base color. However I do not do this often ( except for naked models like the Dire Troll Blitzer below ) as I feel black and white is still the best base color for my minis.

The Noob Way Of How To Paint  Miniaturesphoto

The Khador Wardog is shaping up nicely. I think I am slowly but steadily learning how to blend colors in hand painting. I highly recommend mediums in thinning your Vallejo paints for hand painting! The mediums work like magic!

The Noob Way Of How To Paint  Miniaturesphoto

The Noob Way Of How To Paint  Miniaturesphoto

Read more >>

Wednesday, February 11, 2015

How to Paint Gundam Pilot Figures Tutorial


How to Paint Gundam Pilot Figures Tutorialphoto

I felt I have to put up a quick tutorial on how to paint the small pilot figures that come with most Bandai Gundam model kits. To be honest I do not put so much time and effort in painting these pilot figures normally. I do quick paint jobs on some small figures for my dioramas that are mostly base color and washes that looks okay from afar but looks very unimpressive in close ups.

I am very fond of painting miniatures ( Warmachine ) these days, does I thought of putting up the Pilot Painting Contest.  Although far from world standard miniature painting, I hope this simple quick tutorial would help guide young modelers on how to paint those tiny pilot figures.

How to Paint Gundam Pilot Figures Tutorialphoto

1. Glue or Cement the figures on something ( cork ) that would not be stressful on your fingers. If you glue the figures on a piece of styrene rod or stick, your fingers will get tired fast.

2. Always prime your figures. Primer gives you a nice textured surface that paint could adhere. Primers also has special agents that adheres to plastic, metal or resin way better than normal paints. I paint all my kits ( metal, plastic, resin ) with Vallejo Surface Primer. You need to let the Primer cure for 48 hours if you applied them on metal or resin. 6 hours on plastic is okay.

3.I do Zenithal Priming / Painting in all of my miniatures. So I thought why not adapt this technique in painting Gundam pilot figures. Zenithal Painting makes the details pop and gives you a nice base for your semi-transparent colors to produce subtle tonal shading later. I exaggerated the Zenithal painting by shooting black paint from below ( use black primer to skip this step ) and I shoot white primer directly on top of your figures. Notice the nice shadows produced by this technique after shooting the white primer.

4. Give your figures a nice subtle wash after Zenithal Priming. The wash will further enhance the shadows and deep details of the figure before painting. I use Glaze Medium to thin down my Vallejo Game Inks. Mediums cures to a stronger finish than distilled water and gives your washes a very flowy consistency.

5. After the black wash ( diluted with glaze medium ), you now have a very nice black and white figure to hand paint on. Paint the base colors. Paint from deep recesses upwards. So paint the skin first, then the shirt, then the jacket. The trick is to paint the parts that are sticking out last and paint the deeper areas first.

6. After painting the base color, give the figure another subtle wash. The wash will make the details pop again. This wash will guide you where to paint the highlights and the shadows.

7. Paint the highlights and the shadows

8. Paint the figure with a diluted color ( glaze medium or matt medium ) of the base color. This will blend the highlights, base color and shadows together. Apply thinly as you do not want to lose the detail painting you did in step 7. Apply another layer of highlights if necessary.

9. Top coat with varnish. I use Vallejo varnishes in all my top coating jobs. Top coat with a thin coat of gloss varnish ( for strength ) before the final satin or matt varnish.

How to Paint Gundam Pilot Figures Tutorialphoto

How to Paint Gundam Pilot Figures Tutorialphoto

How to Paint Gundam Pilot Figures Tutorialphoto

How to Paint Gundam Pilot Figures Tutorialphoto

How to Paint Gundam Pilot Figures Tutorialphoto

How to Paint Gundam Pilot Figures Tutorialphoto

How to Paint Gundam Pilot Figures Tutorialphoto

How to Paint Gundam Pilot Figures Tutorialphoto

I hope this simple crappy ( lol ) tutorial helps guide you to paint your first tiny 1/144, 1/100 or 1/60 figure! The figure in the photos are from 1/60 Perfect Grade Gundam model kits.

Thanks as always for dropping by! Until next post guys! Just enjoy the hobby! :)

How to Paint Gundam Pilot Figures Tutorialphoto

Read more >>

Thursday, February 5, 2015

Primer and White Modulation with Vallejos before Hand Painting


Primer and White Modulation before Hand Paintingphoto

I started painting miniatures less than 2 years ago ( March 2012 ) and I am still learning so much on how to work on metals, basing materials and hand painting. So although I am tagging this post as a tutorial, I think I cannot post this up at my tutorials page as I am far from credible in doing tutorials for miniatures as of now.

I am enjoying this hobby so much as I find hand painting after long work hours ( 11am to 8pm ) more relaxing than sanding and sniffing plastic dust. I still love working with Gunpla, but I prefer to sand, scribe, cut and modify plastic kits during weekends.

So I hope you get used to my Warmachine and hand painting posts from now on.

Anyways, I just want to share how I prepare my Privateer Press Warmachine ( metal ) models before I hand paint them ( still learning to hand paint though ).

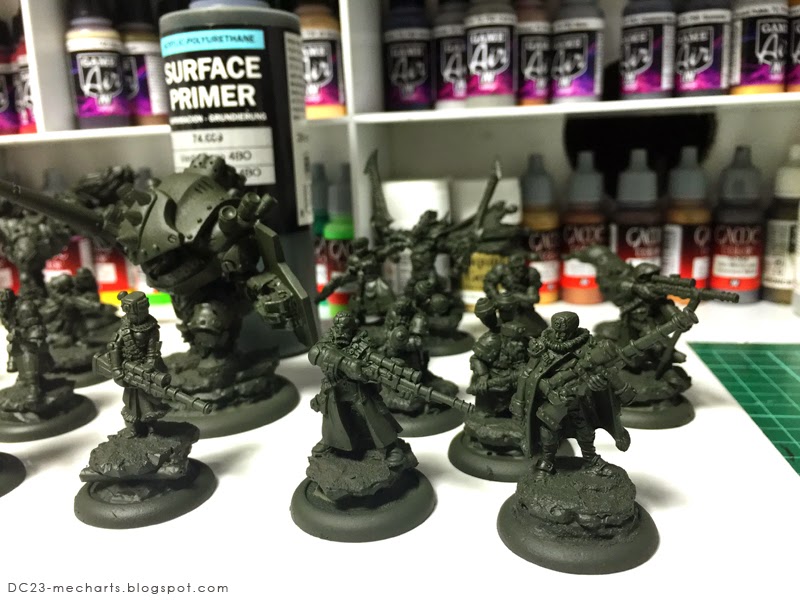
I use Vallejo Surface Primers ( Polyurethane ) for all my priming needs these days. They dry nice and smooth without obscuring the delicate small details. Vallejo claims that their primers adhere to metal, plastic and resin surfaces, so it is an all in one primer for most of your priming needs. Vallejo also offers clear primers ( have yet to get my hands on them ). Clear primers should be great for some toy repaint projects.

Primer and White Modulation before Hand Paintingphoto

Vallejo Surface Primer

I primed these metal models with Russian Green ( I run out of Grey and Black Primer ). It is very important to note to allow 48 hours for the primer to cure for best adhesion.You could paint the models after a couple of hours but very careful on handling the model. Painting after a full 48 hours ( or longer ) curing time will be best as the Surface Primer has cured by then.

I shoot the Vallejo Surface Primer undiluted with my .3 nozzle siphon fed airbrush at around 25 to 30psi. You can dilute the surface primer with Vallejo Airbrush Thinner, but less or no dilution means stronger or better adhesion to the surface. Notice that the primer dries smooth even without dilution and the beautiful details of the models are well preserved.

Primer and White Modulation before Hand Paintingphoto

Primer and White Modulation before Hand Paintingphoto

Primer and White Modulation before Hand Paintingphoto

Primer and White Modulation before Hand Paintingphoto

Primer and White Modulation before Hand Paintingphoto

Primer and White Modulation before Hand Paintingphoto

Vallejo Premium Paint and Zenithal White Modulation

White Modulation is a nice "pre-paint" / " pre-color" step that gives you nice subtle color gradation during painting. Most colors ( specially the bight colors - reds, blues, greens, yellows ) are semi-transparent and shading your models with dark color ( Black, or in this case Russian Green ) and White gives you a nice base that would produce subtle tonal blending once you paint most colors on top.

Unlike Gunpla were you pre or post shade the edges with black or dark greys before painting the colors, They call it Zenithal Priming / Painting on miniature models.Zenithal Priming / Painting is painting the highlights based on the source of light. I always shoot 90 degrees on top of the models with white paint leaving the crevices and the shadow parts dark. This technique makes the details pop out even more once painted.

After Zenithal Priming / Painting, my Warmachine models are ready for hand painting! Sometimes I shoot the main color with an airbrush if the model has a dominant color, but sometimes I just hand paint everything if their is no dominant color.

I thought of using a different range of Vallejo paint for the white modulation this time. I used Vallejo Premium Polyurethane Acrylic White Paint for the modulation. Vallejo claims that their Premium range is the strongest acrylic paint they have. Vallejo Premium was designed for outdoor use. Premium paints are for painting motorcycle helmets, RC Cars, RC Planes, Guitars or anything you need to be super strong.

I will be experimenting on using some Vallejo Premium paints on Gunpla ( for the moving parts - internals ) soon... and if they are as strong as Vallejo claims once cured, I will never ever need to paint with toxic lacquer and enamel paints on Gunpla moving parts ever again.

I did not dilute the Vallejo Premium Paint for use on my airbrush. I did shoot at 30Psi and it worked like a charm. I cleaned and disassembled my airbrush with Vallejo Airbrush Cleaner right after use.

Well that is about it! Now all these models are ready for hand painting. I will be sharing more Vallejo paint experiments soon! Thanks as always for dropping by! Until next post guys! Just enjoy the hobby! :)

Primer and White Modulation before Hand Paintingphoto

Primer and White Modulation before Hand Paintingphoto

Primer and White Modulation before Hand Paintingphoto

Primer and White Modulation before Hand Paintingphoto

Primer and White Modulation before Hand Paintingphoto

Primer and White Modulation before Hand Paintingphoto

Primer and White Modulation before Hand Paintingphoto

Primer and White Modulation before Hand Paintingphoto

Primer and White Modulation before Hand Paintingphoto
Read more >>

Featured Post

Vallejo Mecha Color EXPLAINED

As usual, pardon for the selfies as I desperately try to get comfortable in front of the camera, for my new YouTube channel .  Le...

TOP POSTS