Search This Blog

DC23 Clothing

DC23 Clothing
Find Us At Facebook
Showing posts with label BMKWC 2011. Show all posts

Friday, October 21, 2011

my daughter is joining Gunpla Builders World Cup!


SD Dendrobium photo

A couple of days ago I was talking to a Gunpla friend in the phone and I was bitchin' about the rules of the expert special OOTB category of the GBWC Philippines 2011. Me and my 3 kids were on a mall waiting for both a toolbox23.com customer and my wife. When all of a sudden my eldest 8 year old daughter Nico asked me if she could join the contest for the first time this year.

She has painted ONE first grade Force Impulse Gundam before, and I am pretty sure she will do a little better this time around. She used some cheap Reeves acrylics on her first Gunpla, and I'll lend her some Vallejo paints for hand painting her entry this time.


I'll share to you our little conversation...


Nico: Dad could you get me a small Gundam? coz I want to join the contest this time.

me: Really? why? what kit ? what colors would you paint it? What's your concept?

Nico: I want to paint it Black and Orange and maybe hand paint some Hello Kitty faces.

me: Hmmm, it should have girly colors... black and orange does not really fit you. I have a damaged SD kit ( SD Dendrobium ) in the house. I'll show you later.

Nico: okay, I will paint it pink, white and red then and I want to paint Hello Kitty faces to the kit.

me: I have a kit with a vehicle, if you like you could add rust to the vehicle and make it look that the Gundam is repairing her car. I'll teach you how to add rust and damages.

Nico: No dad, I want the vehicle clean with Hello Kitty painting all over it. I want it white and clean parked in a Garden full of grass and small flowers.

me: So if you want it clean you should use spray cans at least for the vehicle and instead of painting the Hello Kitty faces to the kit, I will buy you some Hello Kitty stickers instead.

Nico: Okay, but I want to hand paint the Gundam.

me: Okay, I'll show you your kit when we get home, but are you joining to win or just to have fun? coz you will be up against 14 year old kids?

Nico: Just joining for fun dad.

Actually the conversation was a bit longer, but that is the gist. So my daughter wants her entry clean and not battle damaged or weathered. She also wants it hand painted but I will insist on the cans at least for the dendrobium. And she wants a diorama and she'll only join just for fun.

So after the conversation with my daughter, I thought I'd JOIN FOR FUN for the first time. Honestly as arrogant as it my sound, I always join to try to win. And my daughter made me realize that we could actually join for fun this time around. Besides my category does not allow dioramas and modifications, so it is just a fun category after all. Nothing serious about it.

Ironic though as my 8 year old daughter is going to compete with 14 year olds, me on the other hand is going to compete with 15 year olds which are more than half my age. lol

Anyways, see you at the Bandai event! Til' next post guys! :)


Read more >>

Sunday, March 6, 2011

Toymaker versus DC23 face-off WIP - big butt done!


As I've said, I can't really do much Gunpla during weekdays this month. My friggin' work schedule simply does not allow me too even hook up in Skype. However, I was able to apply some epoxy on the corners of the butt that needed some repair as seen in my previous post.

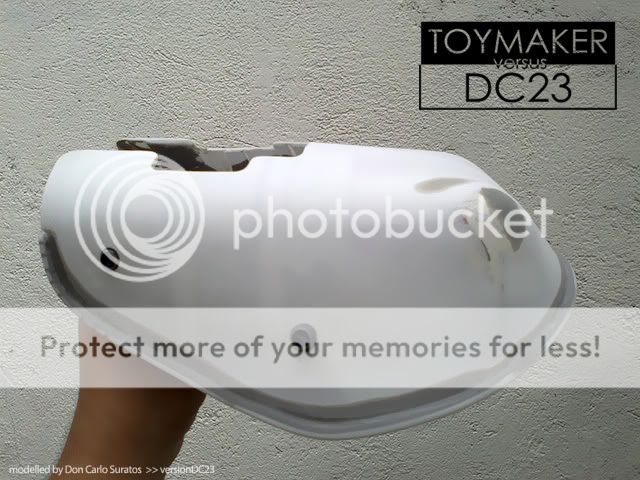
I was also able to successfully add a LIP around the edges of the whole butt. I simply forcefully glued a 3mm square Tamiya pla rod around the edges and applied epoxy with my fingers in between the butt and the square rod. After letting the epoxy cure for 3 days, I then sanded the square " lip " to make it round and also sanded the corners.

Their are still a few errors on a few parts but nothing a nice couple of layers of Tamiya putty would not fix. I also had to bore the holes for the Kotobukiya parts as I reinforced the innards with a thick layer of Epoxy. I highly doubt any modeling stress would deform this really hard shell of pla plates and epoxy now.

I apologize for the crappy out of focus photos as my camera is with my sister in law. This is the very same reason I cannot show some Zeta updates today but will surely take photos for tomorrow's update as I will have my camera by then. Anyways, here are a few more crappy shots of my butt...
Read more >>

Tuesday, March 1, 2011

Toymaker versus DC23 face-off WIP - big butt!


As most of you know I am not good in scratch building, It was a bit of surprise for me though that I kinda pulled off at least the basic shape of the main part of my The O II conversion. I think more or else I was able to get the shape I was aiming for. I just need to pile pla plates or put putty on the damaged corners and sand it smooth and curvy. A visible crack on both sides will also need some reinforcement on the inside and a bit of putty work outside.

The main obstacle of the but is the big hole that I was luckily able to achieve. The layers of .5mm pla plates I added last night was able to make the shell really strong and thick on some of the crucial curved areas. I was aiming for the hole for the main engine block at the butt, much like what you see in the photo below...
Read more >>

Monday, February 28, 2011

Toymaker versus DC23 face-off WIP - basic butt shape


I wanted to start on this project a bit for a couple of days now but I eventually gave in to the urge after seeing this thread at ZeroGunz! Initially Kenny Lim aka Toymaker and I agreed to build a conversion of the O II Hauer. Kenny eventually thought of creating and designing his own version as he mentioned in his post. Our initial take off date is June 2011, but I just had to ride the mood to at least build the basic shape of the butt.

I had a chat with Kenny earlier today and I asked if I could start building mine which is 3 months earlier than the original date. He told me it is ok but he can't start on his own yet, I just feel I had to ask his permission as I think working on it earlier than the agreed date would be cheating.

I won't be working much on this kit though as I still have a lot of other Gunpla projects. As I've said, I just have to ride the mood and at least build the basic shape of the butt of the O II Hauer. Anyways, this is made of a 1mm pla plate that was forcefully bended to form the shape.

The butt of my The O II will be 8 inches long, 5 inches wide on the widest part and 3 1/2 inches on the tallest part. I have reinforced the basic shape with strips of .5mm pla plates to help retain the shape of the butt. I will have to pile up or build up on the pla plate strips to make sure the shape is intact once I remove the tapes and clamps.

I hope to build up enough .5mm pla plate strips and form a really hard shell once the cement has cured. Once I have the shell, I could do anything with it as I won't worry with the butt loosing it's shape anymore. Now here are a handful of photos showing the basic shape of the butt...
Read more >>

Sunday, January 9, 2011

my The O II color scheme...


I saw this magnificently painted kit at Mecha Workshop a while back. Unfortunately I could not credit the modeler who did this as I cannot find any names in the post. As all of you know, I did an experiment last year and see if an entry without loud colors and has rough weathered finishing could win in a contest like Bandai Model Kit World Cup.

The experiment yielded interesting results. Prior to my The Gilgamesh project last year ( 2010 )... I always played it safe in terms of finishing and weathering. I always thought that only clean flawless painted kits  with loud shouting color schemes, wins in big Gunpla competitions and that heavily weathered kits with realistic color schemes does not stand a chance.
Read more >>

my BMKWC 2011 entry!!!


Pardon the quality of the pics as I have no choice but to take photos indoors as it is raining today.

I just finished snap fitting and taking photos of my new MG The O! Halfway into the snap fit I decided that  this kit will be my entry for this years Bandai Model Kit World Cup 2011. I then took a lot of comparison photos with my other kits and some detail shots that will be used for the before and after mod comparison pics. Though I think there is little need for before pics as I plan to super modify this anyways.

The kit is beautiful! It is the biggest MG - volume wise out in the market right now. It has pretty sturdy joints and a very straight forward build. It only took me around 5 - 6 hours snap fitting this and one could further appreciate the engineering put into this build if you have built an old MG Sazabi.
Read more >>

Wednesday, December 15, 2010

What project is more impressive???

photos from Gundam Guy

I am still overly undecided for what to get for Christmas and eventually what to do for my Bandai Model Kit World Cup 2011 entry. I need your help guys as I have trimmed my options to 2 kits ( no budget for a PG yet ), I will be either getting the MG The O or wait for the 1/48 Mega Scale Zaku until around late December.

I might eventually get both, I mean get the MG The O this December and then get the 1/48 Mega Scale Zaku on January. BUT still the question remains... What kit would be best for my BMKWC 2011 entry??? I mean what would you like me to mod? a 1/48 Zaku and convert it to a Super Custom Zaku F2000?

OR modify a MG The O to look like the The O II / Hauer in the sketch above. Both projects will be ultra mega challenging for me of course. But I would like to know your ( my readers' ) opinion on what is the best for my year end entry?
Read more >>

Featured Post

Vallejo Mecha Color EXPLAINED

As usual, pardon for the selfies as I desperately try to get comfortable in front of the camera, for my new YouTube channel .  Le...

TOP POSTS