Search This Blog

DC23 Clothing

DC23 Clothing
Find Us At Facebook
Showing posts with label 1/72. Show all posts

Sunday, February 20, 2011

Finemolds 1/72 Star Wars X-Wing Fighter

click image to enlarge to wallpaper size

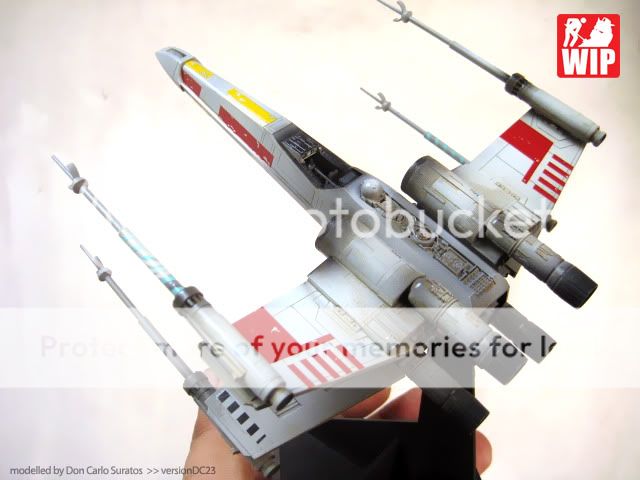
I have been working with this beautiful kit for a few days now ( or a week ) and this kit has been my project during our Skyping sessions. I highly recommend this 1/72 kit by Finemolds as I honestly think a first time 9 year old kid could produce great results with this.

I desperately painted the pilot with red and yellow markers to produce orange as I did not have any orange paint last night. I painted the pilot visors with Citadel Bronze, painted the gloves and boots with black fine Gundam markers and gave it a flat brown enamel wash. It came out ok I think as it ill be covered by a tinted cockpit cover anyways.

I made a few booboos during the build but I really enjoyed this kit so much. My base paint had some nasty small orange peels thus I opted to sand the whole kit. The sanding exposed some of the original plastic and chipped away some decals. I like the effect so much I will always sand down kits that I plan to weather from now on. It is I think a great way to show some natural looking chipping effects. 

I also sprayed too much Tamiya smoke as I was eager to finish the kit already. It is a major booboo in a way coz you cannot barely see the pilot because of the heavy tinting. The overall grey color is a bit too dark for my taste too but it looks ok in the photos. I also needed to reduce the amount of grains in the background of the photos so I needed to photoshop the pics a bit more than usual.

So many booboos for a simple relax build but I had so much fun building this. I am now thinking of getting a Tie fighter to accompany this in a small diorama soon. Now here are tons of photos of my first Star Wars model kit and my second finished kit of 2011...
Read more >>

Friday, February 18, 2011

1/72 Star Wars X-Wing Fighter - initial wash and decals


Managed to do an enamel wash last night ( early morning ) even though I was in Skype with some moronic MAC members ( hehe ). I used Tamiya flat earth for my first enamel wash just to give it an overall dusty look.  I was also able to do some of the major decals today even though I woke up late because of Skype. 

I realized before doing the decals that you could actually build a clean version of the X-Wing as there are decals without chipping. Oh well, I am most comfortable in weathered builds anyways as my airbrushing skills kinda sucks. 

I also realized that all of R2D2's markings came as decals, thus I won't actually need to paint all those blue square thingees for R2. I will have to seal this with future later after the Mark softer I applied on the decals has cured. 

I will have to blend those decals later, maybe spray some white and some Tamiya smoke to try to blend it. I will also give it some enamel washes in deeper colors ( maybe hull red ) to complete the build.No more WIP updates on this, will just post the completed finished kit soon! Anyways here are some photos of the kit with decals...
Read more >>

Thursday, February 17, 2011

1/72 Star Wars X-Wing Fighter - base color painted


I needed a quick modeling fix before going to work today thus I thought of painting the X-Wing Fighter its base color. I visited master FichtenFoo's site to check how he painted his X-Wing coz I have zero idea on what colors to paint mine.

I really like master Foos shading but I wanted mine to have a bit more contrast, so I did some heavy shading on the turbines and thruster parts. I like how it came out but the other parts are still a bit too white. I already sealed the paint with future and it should be ready for decals later today or tomorrow.

Even though I added a few drops of khaki and light blue to the white, I still find the base color looking too white and clean. After the decals and the washes soon and I still find the color too white, I nice coat and some shading with Tamiya smoke should reduce the whiteness of the base color. 
Read more >>

Wednesday, February 16, 2011

1/72 Star Wars X-Wing Fighter


The unavailability of the 1/35 Core Fighter made me grab this kit the other day. I immediately assembled and glued the parts together which took me about 5 hours to do so. The box contains 5 runners, a large decal sheet, a manual for assembly and a manual for the decal placement.

I am not really a huge fan of Starwars though I like very much all the ships, walkers and cruiser designs in all the movies. I do think it is a bit late for me to collect the figures back in 2001 as they have released so much even back then. Though I do think its not late for me now to build the kits if I could find more.

This is the 1/72 Star Wars X-Wing Fighter made by Finemolds. Upon inspection of the parts of the kit, I now know why Finemolds calls themselves Finemolds! The detail on this kit is very clean and crisp and the alignment of the parts is just perfect.

I took me a while to assemble this fine kit as I was fixing the seam lines while building it. Now here are some photos of this very beautiful kit from Finemolds...
Read more >>

Monday, November 8, 2010

" The Gilgamesh Project " - DC23


click to enlarge to 1600 x 1000

The concept behind the Gilgamesh project is simple... " The Gilgamesh Project " is a secret mecha project in the remote regions of Northern Siberia. A small Zeon faction created this monster out of old Zeonic technologies. The mecha has been wrecking havoc on Federation forces for 5 years now, however the enemies has this mech as unclassified. No one has lived to tell the tale of the attacks of this monster, The Gilgamesh is often referred to as the " White Shark " or the " White Sunset ".

The diorama is made of of different plastic scraps from M&M canisters to small 1 inch PVC pipes. The figures used are basically out of scale coz they are 1/72 military figs. Obviously the main kit is the MG Sazabi and parts from 1/144 GNX and MG Qubeley was used to enhance the overall look.

I painted this with Tamiya acrylics and weathered it with Mungyo dry pastels, Tamiya enamels, Citadel paints and Tamiya weathering master. The diorama was painted with Bosny ( industrial grade ) spray cans and was weathered in the same manner as the mech. It took me roughly 3 months to finish this build. 

Now I present to you my latest diorama... the Gilgamesh project...

Read more >>

Wednesday, October 27, 2010

Snow Hangar diorama WIP summary


This hangar diorama has so much multiple posts scattered in this blog, I decided to put up a simple summarized version of the build. The build looks simpler and easier in this post and it is a lot more fun to see the progress in a single entry.

Now lets get through the build swifly with some old photos and descriptions of the build...

First, I constructed a hill with some styropor glued together, got a yellow plastic crate as the base, used some pla plates for the walls and floor and used some extra plastic materials like balloon sticks, M&M canisters and some pvc pipes.

My kids helped me apply some paper mache over the styropor hill... 
Read more >>

Wednesday, June 9, 2010

1/72 pilot figures from Hasegawa - quick review


Perfect for PG Gundams! ok, ok I know...PGs are in 1/60 scale and this figs are in 1/72 scale. Good luck finding 1/60 figures then ( at least in the Philippines ). Same as using 1/87 HO scale figures for 1/100 Gundams... Goodluck for finding 1/100 figs that has nice poses. Or I guess you would rather use 1/100 figures that came with the MG kits? That is great, if you have the skills and patience to alter there poses. XD

Now, here is a quick and short review of a 1/72 pilot figure set from Hasegawa. I was kinda surprised when I saw the figures after opening coz they are 1 piece figures. Usually, unpainted 1/87, 1/72, 1/48, 1/35, 1/24, 1/20 and 1/16 comes unassembled.

A few unpainted 1/87 figures that I used in my 1/100 scale The Graveyard diorama came unassembled much like any 1/35 fig. You have to cement the head, arms, legs and sometimes an accessory. This one on the other had came assembled already. Kinda weird but after inspecting the details, it is almost at par with the PREISER 1/87 unpainted figures that I used before.

If I were to rate the quality of the detail of this figs from Hasegawa from a rate of 1 to 10...I would rate this in the no. 8 spot. No. 10 for the Preiser unpainted figures and no. 3 for the small figures bought in art shops.

The package came with a simple manual and 12 figures, well basically you get 12 figures with 6 designs...two figs are of the same mold. Anyways here are some pics for you to decide if you like these figs for your diorama...a must have I think to liven up any diorama out there...
Read more >>

Tuesday, June 1, 2010

Packing the AC White Glint for shipping...


This post is mainly for my client, I started packing my AC White Glint for its long travel to the US ( from the Philippines ). I used a lot of styropor to fasten it inside a MG Zeong box and reinforced the layers of styros with some barbecue sticks. My wife told me that the shipping company might check the contents before they allow shipping so I will add tons of shredded styropors to fill in the gaps and seal the box after they have inspected it in the shipping company.

The nearest FEDEX is a long 2 - 3 hour drive from my place, thus I have to research a bit on some alternatives that is nearer my home or office. Also, I have yet to withdraw the money sent to me for shipping by the client in my paypal account.

Anyways, here are a few photos of the packing of the AC White Glint...
Read more >>

Thursday, May 27, 2010

Armored Core WHITE GLINT with V.O.B. ver DC23


Ello guys, I just finished putting the final topcoat of my very first international commission work, which is the AC White Glint build and finally it is done! I actually worked on this for 2 1/2 months ( on and off ) and I got the kit around February 28. The kit as I've said before looks really really impressive and is my most impressive looking build so far.

There are a lot of seam lines to work on and there are a gazillion small parts to paint but it was truly a great experience to have worked with a non - Gundam kit. As per the client's intructions which is to glue the loose parts ( make it feel more solid ) and weather the kit, I think I did a fairly good job.
Read more >>

Monday, May 24, 2010

AC White Glint - almost, almost done!!!


Ello guys, I could have finished this build today if NOT for running out of Zippo lighter fluid! Dang!!! I hate it whenever I run out of supplies in the middle of work! hate it!

I have masked and painted the black parts of the Vanguard Overed Boost ( V.O.B. ) cylinders earlier today and have also given the White Glint ( WG ) some enamel washes...though I ran out of lighter fluid! I have re assembled a few segments of the V.O.B. and have mostly assemble the White Glint except the legs.
Read more >>

Sunday, May 16, 2010

AC White Glint - WIP part XVI - last update


Ello guys, this will be my last WIP update of the AC White Glint commission build. I will definitely be shipping this to the US by the end of May ( or even next week ). I have given the parts 4 layers of gloss coat using future straight from the bottle yesterday and have let have it cure overnight to prepare the surface for the enamel washes.

I then mask the parts on the Vanguard Overed Boost ( V.O.B. ) parts that needs to be black with Tamiya tape and I have also painted the black parts of the V.O.B. I will ten have to drybrush the black parts with silver after painting.

This build is almost done, I will have to spray black on the mask V.O.B. parts later, give all the parts an enamel wash of Tamiya flat earth and spray the final flat topcoat. I am still thinking of modding the base that came with the kit and also weather it. Anyways here are a few pics...
Read more >>

Friday, May 14, 2010

AC White Glint - WIP part XV - Paint chipping FX


I am currently adding paint chipping effects to the AC White Glint and Vanguard Overed Boost ( V.O.B. ) parts. I am using the usual sponge technique for the small paint chippings ( using a Citadel paint ) and a fine tipped gray Gundam marker for the bigger scratches and paint chippings.

The focus here is to overdo the damages on the WG, specially on the torso, manipulators, feet and legs and make lesser paint chippings on the other parts specially the V.O.B. parts. I think with some proper lighting once the kit is finished, The results of the weathering will be much more evident.

As you can see I have not given the kit an enamel wash yet...after the paint chipping effects I will seal it with future and give it an enamel wash of flat earth. The flat earth will give it a warmer tone and a more realistic feel to the weathering. Anyways here are some pics of my progress so far...
Read more >>

Thursday, May 13, 2010

AC White Glint - WIP part XIV - White parts painted!


Ello guys, I just finished painting ALL of the white parts of both the White Glint and the Vanguard Overed Boost ( V.O.B. ). It took me roughly around 4 hours to finish, 2 bottles of Tamiya flat white and a cup of future. I also managed to paint the V.O.B. boosters and started to paint the guns.

I got tired already, so the guns will be repainted some other time. Hopefully you can see in my lousy pictures that I did some subtle shading with the whites. I first painted the crevices and a few corners with flat black then sprayed flat white all over. The Tamiya acrylic paint retarder worked like a charm as usual and the paint went really smooth.
Read more >>

Monday, May 10, 2010

AC White Glint - WIP part XIII - White parts primed!


Ello guys, the AC White Glint client ( from the US ) has fully paid this build yesterday through paypal...wahoo! Though it's kinda embarrassing to get the full payment coz I just finished priming ALL the White parts of the AC and also a few pieces like the guns and a couple of parts over the shoulders.

Anyways, I made a slight booboo while priming the parts... a few parts ( shoulder armors ) where hit with some overspray producing a slight sandy texture. I then sanded it a bit and resprayed but a few small portions of the said parts has some slight texturing still. However after looking at it for a whil, I kinda liked it...I think it will give a nice look once I have weathered this kit.

I now plan to add a few textured areas to the other parts during painting as I weather this build. 95% of the parts primed today are so smooth though, I will have to roughen it a bit during painting as again this would have a weathered look overall after. Now, here are some pics...
Read more >>

Monday, May 3, 2010

AC White Glint - WIP part XII - prepping for priming


Ello guys, I had some personal commitments last weekend thus I was not able to paint this kit. However I did managed to squeeze in a few hours on it and disassemble the kit for priming. I decided not to prime the parts as planned though coz after separating all the white parts and the other parts, I realized that I have to deepen some existing rivet holes on a few parts and I also decided to add more rivet holes to the other parts as well. I basically took a break from drilling holes and posted this first...I will drill holes and clean up some other small overlooked parts before priming and painting the parts this weekend. Now here are some pics of my progress today...

A photo showing how a part looks like when you deepen the holes with a .3mm drill bit...it looks better of course, plus it will be much easier to paint the holes later and is more visible.
Read more >>

Tuesday, April 27, 2010

What happened to my AC White Glint build??? ;D


What happened to my AC White Glint build?...well, nothing really... for those very few ( if there is any ) people who are curious to what happened to the commish build, I figured I'd post about it. Anyways, I have not touched the White Glint for 2 weeks now, as most of you know this is my first international commission work, being my client is from the US.

The client basically emailed me to hold off the shipping until June, so naturally I was planning to paint this a couple of weeks ago but figured the painting session could wait until around May. I don't need 2 months to paint this after all. Plus I simply got lazy to paint it, coz I won't be able to ship it anyways. hihi...
Read more >>

Tuesday, April 6, 2010

AC White Glint - WIP part X


UPDATE 04-06-10 : initial torso and shoulder mods...

Ello guys, this is just a quick update before going to work today... guess what? I remove another seam line today, this time the shoulder armor. I overlooked it before, coz the seam line at the top part is well placed and is very passable not to remove it, but then I realized that the bottom part has a nice long seam line running through out the whole part. 

Basically, I glued the shoulder armor tight but of course retained the transformation gimmick...I also added some quick and usual koto option parts detailing and will add on my usual non sense, purely cosmetic pla plating all over the torso and shoulder parts later after office. I did all this in a couple of hours...so if I a lot at least a couple of hours everyday instead of just working on weekends, I think this will speed up my progress. Anyways here are some pics...
Read more >>

Saturday, April 3, 2010

AC White Glint - WIP part IX


UPDATE 04-03-10 : MORE seam lines!

Ello guys, I planned to detail the AC White glint earlier today...but NO, I somehow overlooked a few more parts that needs it's seam lines removed...yes, after all the seam lines I have already removed ( chest, legs, forearms and all the Vanguard Overed Boost cylinders ) there are still more seam lines on this kit.

The gray thingee at the tip of the shoulder armors, the thingee that has all the small thrusters at the back and the side skirts...all have seam lines. Add to the fact that I had to mod those parts a bit for easier painting later. I mean mod them so that I would not have to mask the parts with different colors. Anyways let's go through more seam line removal pics ( weee! )...
Read more >>

Saturday, March 27, 2010

painting 1/72 trucks


Ello guys, I reconstructed another small WIP part of my huge " The Graveyard " diorama...I do this coz I think that minor parts of the WIP will just be buried in the 38 WIP pages @ ZeroGunz and creating mini tutorials of it in my blog would be more accessible to my readers. 

This is basically a very amateur way of painting 1/72 kits for your Gunpla dioramas...I see lots of WIPS of armor painting that has a bit of complicated steps, which are really nice and has very good and subtle play of color tones and textures...But hey, if you are in a hurry to add a small truck to your Gunpla diorama, I think you need not spend a week to work on such a small kit. I did this truck for at most a few hours, maybe 3 hours tops and it did fine and looks ok in the diorama...
Read more >>

Featured Post

Vallejo Mecha Color EXPLAINED

As usual, pardon for the selfies as I desperately try to get comfortable in front of the camera, for my new YouTube channel .  Le...

TOP POSTS