Search This Blog

DC23 Clothing

DC23 Clothing
Find Us At Facebook
Showing posts with label Work in Progress. Show all posts

Monday, December 16, 2019

MG Gunner Zaku Warrior Commission!


MG Gunner Zaku Warrior Commission Photo

No guys, this is NOT a review or unboxing post. We have the great Dalong.net and some Hobby Shops and Snap fitters at Youtube, for that already.

I just got this delivered to my studio by my client. This is my first Gunpla commission back to Gunpla. I will do some minor modifications to this kit.

I will start snap fit tonight after fetching the kids from school.

I plan to add my usual holes to some corners of the armor parts, do my usual armor trimming, a few panel line work and some chisel work ( still waiting for my new chisels from HobbyMate ).
This build should be fun. I will produce Youtube videos for some of the work done to this kit ( including the painting with Vallejo Mecha Colors ).

Pardon as this post is not really a review or unboxing. But then again we have other people for that.

Excited to share to you this build both here at my old blog and at my new Youtube Channel!

Thanks as always for dropping by! Until next update guys! Just enjoy the hobby!

Cheers!


MY PARTNERS

I only paint my Gunpla, Miniatures and Action Figures with Vallejos - Acrylicos Vallejo

I only use Harder & Steenbeck airbrush - Harder & Steenbeck Airbrush

I get my tools only from HobbyMate Singapore - HobbyMate at Facebook


I get my Vallejos and Miniatures only at Neutral Grounds - Neutral Grounds PH at Facebook


MG Gunner Zaku Warrior Commission Photo

MG Gunner Zaku Warrior Commission Photo

Read more >>

Saturday, December 14, 2019

Priming the Full Armor Gundam RX781 with Vallejo Mecha Primers


Priming the Full Armor Gundam RX781 with Vallejo Mecha Primers Photo

First off, I paint outdoors in my tiny red paint booth. Even though I am using non-toxic ( Eco friendly as branded by Shoppee ) acrylic paints in Acrylicos Vallejo

Sometimes I also use gas masks, but was lazy to wear one today, as it was steamy outside. 

Also, not seen here in the photos, I clean my Harder&Steenbeck ( which is so easy to clean ) in between sprays. I blow a couple of drops of airbrush cleaner in between sprays and dump and blow air through the airbrush under a pale of water. 

Anyways, I got this beautiful GSB Masterwork Full Armor Gundam RX 78 1 way back, from a close Gunpla friend in Omar aka Aor_or_die of Italy ( Italy Gunpla Champion 2008 ). 

Priming the Full Armor Gundam RX781 with Vallejo Mecha Primers Photo

I took apart the kit and cleaned it a bit with Vallejo sanding sponge ( 800 / 1000 grit ). Altho it is still not the cleanest resin kit in the world, I think it will do. I wanted to paint already.

Priming the Full Armor Gundam RX781 with Vallejo Mecha Primers Photo

Priming the Full Armor Gundam RX781 with Vallejo Mecha Primers Photo

Priming the Full Armor Gundam RX781 with Vallejo Mecha Primers Photo

Priming the Full Armor Gundam RX781 with Vallejo Mecha Primers Photo

After sanding and clean up, I then primed the pieces ( large ) with Vallejo Mecha Black Primer. 


Vallejo Mecha Black Primer

RATIO

40 parts Black Primer : 10 parts thinner : 10 parts flow improver

I actually thinned this a little more than needed, as I sprayed from a distance than usual. Some areas are hard to reach as I cannot disassemble the main torso part. Thinning a little more ( 2 drops each of thinner and flow improver ) allowed me to produce a smooth finish as the primer is not drying mid air. 

To be honest, I do not really stick to certain ratios as I also paint on canvas. Meaning as a fine artist ( sometimes ), I am used to varying opacity ( and sometimes consistency ) of acrylic paints ( I use only expensive professional brands ). Part of being an artist is mastery of your medium of choice anyways. 

So I do eye tests when thinning. ( My youtube video should show this more ). A silky milky consistency is a must. It should be creamy enough to stick to the glass cup ( a bit ). Glass cup I use to mix paint. But smooth or silky enough to slide through the glass when pouring to the airbrush cup. Also it is very important to have a piece of test paper in front of you, to test spray on, before spraying on the actual kit. 

 The Vallejo Mecha Color Black Primer is a gift from above. A couple of my social media posts shows the durability and adherence of this primer to the resin kit, during priming. The Black Priming went super smooth as expected. The consistency of the Black Primer was ready for airbrushing ( I personally thin all my Vallejo paints when airbrushing tho ).

Priming the Full Armor Gundam RX781 with Vallejo Mecha Primers Photo

Priming the Full Armor Gundam RX781 with Vallejo Mecha Primers Photo

Priming the Full Armor Gundam RX781 with Vallejo Mecha Primers Photo

Priming the Full Armor Gundam RX781 with Vallejo Mecha Primers Photo


Vallejo Mecha Sand Primer

The Mecha Sand Primer was my choice for sketching instead of the usual white. My experience in illustrations ( both digitally and traditionally ) made me choose this color for my sketching ( pre shading for older modelers ). 

The Sand Primer should give the Greens later on, more depth. The Sand primer should give a richer tone to the painting later on. 

I thinned the Sand Primer a little more than usual ( I lost count of the ratio ), as the paint was thick. Creamy thick like Model Color paints. More thinner, but not too much allowed me to control the paint as I was sketching. Control is most important when sketching. 

I did adjust the rear knob of my Harder&Steenbeck to limit the paint flow and lowered the air pressure to around 15psi ( I was black priming at 20psi ). 

Overall the priming went well! Albeit I had to thin the Sand Primer a bit more than usual. 


Conclusion

I love Vallejo Mecha Color Primers. LOL. 

I am editing the video tutorial of this priming tonight. I cannot commit on when I can finish my Youtube video as of this writing tho. But I hope you still found this article informative.

Thanks as always for dropping by! Until next post guys! Just enjoy the hobby! 

Cheers! 


Priming the Full Armor Gundam RX781 with Vallejo Mecha Primers Photo

Priming the Full Armor Gundam RX781 with Vallejo Mecha Primers Photo

Priming the Full Armor Gundam RX781 with Vallejo Mecha Primers Photo


Priming the Full Armor Gundam RX781 with Vallejo Mecha Primers Photo


Read more >>

Friday, December 13, 2019

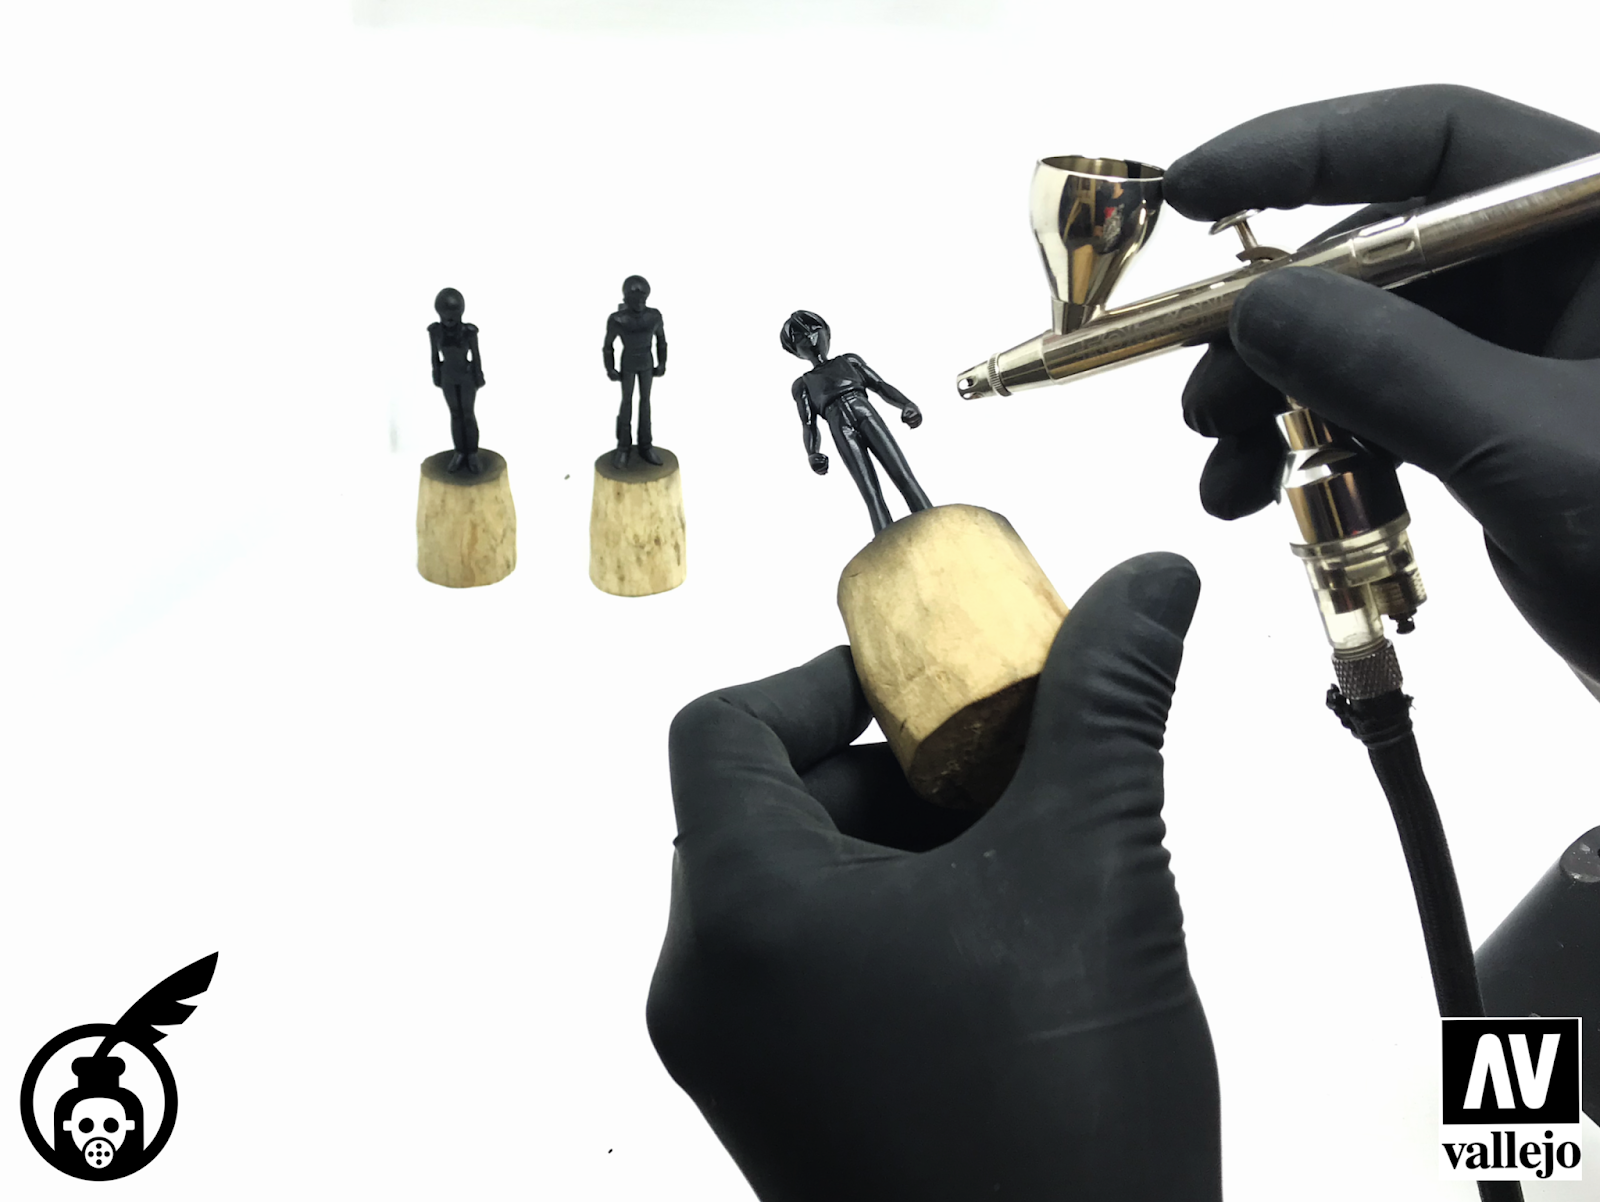
Zenithal Priming Gundam Pilots with Vallejo Mecha Color Primers


Zenithal Priming Gundam Pilots with Vallejo Mecha Color Primers Photo

Cleaning up these Pilot figures are... hmmm... different ( difficult for me actually ). The material is more rubber than plastic. The material is difficult to sand and clean up.

I practically sculpted or sliced thin strips of flesh colored rubber to remove the mold lines. The slicing  is very visible on the Youtube video. I was able to sand the other areas with Vallejo sanding blocks. I used 1000 grit. If you use a grit lower than 600, the rubber becomes rough. Anyways, you have to try to clean one of this to know how to clean it up.

I super glued the foot to a cork. Needed to add more super glue than usual as the cork was absorbing it. After around 10 minutes of letting the glue cure, I then primed the figures with Vallejo Mecha Color Primers. I have been using Vallejo Polyurethane primers for 10 years now, but it was my first time to use the Mecha Color Primers. I thinned the MC ( Mecha Color ) Primers as usual.


RATIOS - These are very rough estimates. My videos at Youtube better shows how I dillute Vallejo Mecha Color paints for airbrushing.

20 drops Black Primer : 2 drops Thinner : 5 drops Flow Improver

20 drops White Primer : 1 drop Thinner : 5 drops Flow Improver


I thinned the White Primer less than the Black Primer, as it is thinner than black primer to begin with. It spray well. I only use Harder & Steenbeck for airbrushing tho. But my thinning worked well with my airbrush.

The Vallejo Mecha Color Black Primer has great coverage as expected. It went smoothly through my airbrush without hiccups. I will not add thinner ( or just one drop of Flow Improver ) to the White primer next time. Less primer should give it a better coverage. My airbrushing of both went well.

I clean my Harder& Steenbeck Silverline airbrush with Vallejo Airbrush Cleaner ( thinned 50:50 with water ). Then I blew my ab under a tub of water. Then blew another good few drops of Vallejo Airbrush Thinner, for the mechanism.

Done. I blew some air to the primed figures with my ab, before packing up.

I like letting Vallejo Primers for a day ( or at least overnight ) before airbrushing again or hand painting. A strong Vallejo priming ( and painting and varnishing ) is all about following curing times to ensure great adherence and durability.

I hope you find this post informative. Thanks as always for dropping by! Until next post guys!

Cheers!


Zenithal Priming Gundam Pilots with Vallejo Mecha Color Primers Photo

Zenithal Priming Gundam Pilots with Vallejo Mecha Color Primers Photo

Zenithal Priming Gundam Pilots with Vallejo Mecha Color Primers Photo

Zenithal Priming Gundam Pilots with Vallejo Mecha Color Primers Photo

Zenithal Priming Gundam Pilots with Vallejo Mecha Color Primers Photo

Zenithal Priming Gundam Pilots with Vallejo Mecha Color Primers Photo

Zenithal Priming Gundam Pilots with Vallejo Mecha Color Primers Photo

Zenithal Priming Gundam Pilots with Vallejo Mecha Color Primers Photo

Zenithal Priming Gundam Pilots with Vallejo Mecha Color Primers Photo

Zenithal Priming Gundam Pilots with Vallejo Mecha Color Primers Photo

Zenithal Priming Gundam Pilots with Vallejo Mecha Color Primers Photo

Zenithal Priming Gundam Pilots with Vallejo Mecha Color Primers Photo

Zenithal Priming Gundam Pilots with Vallejo Mecha Color Primers Photo

Zenithal Priming Gundam Pilots with Vallejo Mecha Color Primers Photo


Shout Outs

I only paint my Gunpla, Miniatures and Action Figures with Vallejos 


I get my tools only from HobbyMate Singapore 

I get my Vallejos and Miniatures only at Neutral Grounds 


Read more >>

Saturday, February 25, 2017

Trollbloods Inspired Poster in Progress


Trollbloods Inspired Poster Photo

All photos were posted at my Instagram, Twitter and Facebook Page... But I felt like blogging about this piece, as it is taking me a bit long to finish it. This is a photo heavy post.

I wanted to create something big, something nice to help launch my ONLINE SHOP, So I decided to do this huge project. I am enjoying the experience so far... BUT, I honestly cannot put a price on the original piece. I will also LIMIT the number of digital prints as usual.

These are Trollbloods inspired characters from Privateer Press. I own a handful of Trollbloods miniatures and I love playing my small Trollbloods army against my son's Legion, once in a while. Needless to say, I love my TROLLBLOODS!

It's been a week since I started this project. I hope to finish it tomorrow or Monday. Not too sure if I can. I will surely be so stoked once I finish this. This is the biggest detail heavy illustration I have done so far. I actually plan to do some more.

I might do the other armies next! I might also do  Ghostbusters, TMNT and He-Man posters soon! Depends on the mood... artist's mood is very unpredictable! LMAO.

Finished poster HERE

Anyways, hope you'll enjoy the progress photos below. Thanks as always for dropping by! Until next post guys! CIAO!

Trollbloods Inspired Poster Photo

Trollbloods Inspired Poster Photo

Trollbloods Inspired Poster Photo

Trollbloods Inspired Poster Photo

Trollbloods Inspired Poster Photo

Trollbloods Inspired Poster Photo

Trollbloods Inspired Poster Photo

A few close-ups of this poster...

I enjoyed doing both the furry coat of Borka and the foliage on the sides of the filler character.

Trollbloods Inspired Poster Photo

Trollbloods Inspired Poster Photo

Trollbloods Inspired Poster Photo

Read more >>

Monday, March 16, 2015

Quick Warmachine Game Table verDC23


Warmachine Game Tablephoto

Just wanted this quick project archived here in my blog. This is a simple Warmachine / Hordes table mat / table for me and my kids. This is far from done as my son is requesting trees ( forests ), damaged houses and more details. Looking forward to adding modular obstruction pieces and forests from time to time.

I used to play with my 8 year old son on top of the dining table but after putting up this table a couple of weekends ago, me and my son are enjoying our games so much more! We play at least 2 back to back games in the mornings and 2 back to back games in the afternoon. Yesterday ( Sunday ), we even played a game before going to sleep.

I never realized that playing a tabletop game ( Warmachine / Hordes ) on top of a custom table, makes the game 10x more fun! Looking at the opposing army on top of a painted terrain makes the experience so much more exciting.

This post is not really a tutorial on how to make a custom Warmahordes table as this is too simple in the first place. But I do hope to inspire others that making a table mat is so simple and easy. I got three ( 3 ) 2feet x 4feet styropors, cut them to shape, glued ( wood glue ) some aquarium sand, painted with cheap acrylics, and sealed with polyurethane varnish... voila! super fun table that is relatively cheap!

Hope to add more details on the table once in a while and post some battle reports sometime soon. Thanks as always for dropping by! Until next post guys! :)

Warmachine Game Tablephoto

Warmachine Game Tablephoto

Warmachine Game Tablephoto

Warmachine Game Tablephoto

Warmachine Game Tablephoto

Warmachine Game Tablephoto

Warmachine Game Tablephoto

Warmachine Game Tablephoto

Warmachine Game Tablephoto
Read more >>

Featured Post

Vallejo Mecha Color EXPLAINED

As usual, pardon for the selfies as I desperately try to get comfortable in front of the camera, for my new YouTube channel .  Le...

TOP POSTS