Search This Blog

DC23 Clothing

DC23 Clothing
Find Us At Facebook
Showing posts with label making simple dios. Show all posts

Monday, October 10, 2011

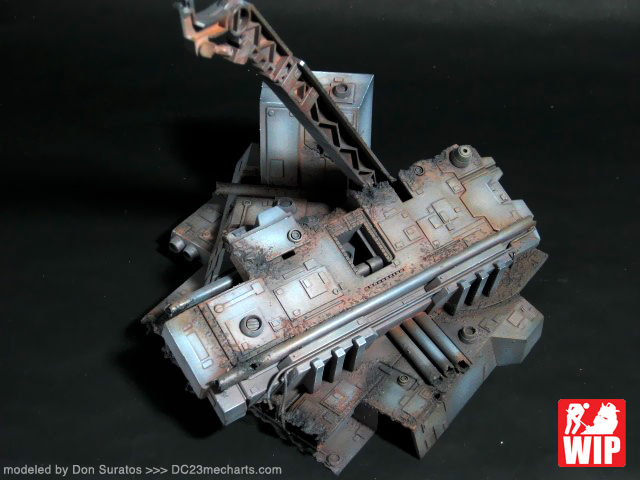
custom base for MG Zeta Gundam Karaba done!


custom Gundam diorama photo

I still have my photo set up in my work bench as I just used it for my other MG Zeta commish that I just finished earlier today. So after walking my dog, I figured why not use the same set up and take photos of my just finished custom base for my other MG Zeta commish.

I finished painting this yesterday but was lazy to post it here in my blog. I thought the client might want to see my progress so ended up posting it anyways. This base was the one I used for my quick tutorial on making a one hour custom base for your model kits. Obviously it is not an hour build anymore.

Took me a few hours to detail this little bugger and another few hours on painting it. I think it roughly took me around 6 hours to finish this custom base for my MG Zeta Gundam Karaba commission work. I painted this with Tamiya acrylics, painted it black after adding the rust texture with Vallejo and post shaded with light bluish grey.

I then gave it some Tamiya enamel washes, Vallejo washes and some Vallejo pigments. I then sealed it with future then gave it a final matte coat with Vallejo. Now here are some photos of my quick custom Zeta Gundam base / diorama...


custom Gundam diorama photo

custom Gundam diorama photo

custom Gundam diorama photo

custom Gundam diorama photo

custom Gundam diorama photo

custom Gundam diorama photo

custom Gundam diorama photo

custom Gundam diorama photo

custom Gundam diorama photo

custom Gundam diorama photo

custom Gundam diorama photo

custom Gundam diorama photo

Thanks for dropping by! Til' next update guys! :)


Read more >>

Thursday, April 7, 2011

Finding the perfect balance in my dioramas...


custom_Gundam_base

Pardon me for wasting your mouse click to this post guys.  But I got itchy to construct the skeleton of a new diorama project. Nothing new here as I pretty much did a diorama out of CD cases and diskettes before. And nothing much to show as I only glued together 20 diskettes, 18 CD cases and a couple of diskette cases.

A fellow modeler who is actually writing a " study " in diorama building interviewed me a couple of days ago. The interview actually inspired me to build this mega size diorama and hope to do better this time. I hope to find the perfect balance with this new project.

" Perfect Balance " ? What the hell is this guy talking about? you ask? lol
Well, I think I still have to strive more on how to hit that perfect balance between the subject of the dio and the diorama itself. I want a really detailed mecha as the main subject, I also want the overall look to focus on the main subject, but I also want a really busy diorama to compliment the main subject.

My " The Graveyard " diorama which focused so much on utilizing my old Seed kits and focused so much on the details of the diorama, has a very bad composition. The Infinite Justice actually looks out of place as it has little or no interaction with the base.

My " Gilgamesh Project " on the other hand focused too much on blending both the main subject ( Sazabi ) with it's surroundings. Although it looks pretty descent, both the main subject and the diorama are too complimentary and the lack of action just made it a tad boring. The diorama although it complimented the main subject well, just lacks the " punch " you are looking for in a good diorama build.

SO, the focus this time is to create a diorama that has both the main subject/s and the base complimenting each other, but at the same time would stand out on their own. I need an extra " punch " to the overall look of the diorama and I think some careful planning of the poses, the angles and the details of both the subject and the base would do the trick.

Hopefully as I go along working on this project, we could revisit this post and clearly identify what I am blabbing about. Anyways, here are a few more photos of the skeleton of my diorama so far...

custom_Gundam_base

custom_Gundam_base

custom_Gundam_base

Thanks for dropping by! Til' next post! :)


Read more >>

Monday, December 21, 2009

Paint Chipping with the Hair Spray Technique


UPDATE 12-21-09 : Painting the base...

Hello guys, I just got home from the grocery an hour ago and primed the base, I also gave it some battle damage effects with a soldering iron...

I usually use Bosny grey primer, but I decided I will try the hairspray technique used by other modellers like fichtenfoo...the hairspray technique will expose the first layer of paint, making it look like paint chipping. I used RJ primer red, coz it looks like rust in a way...First I did a preliminary coat of primer red just to see how the base looks like...


Read more >>

Sunday, December 20, 2009

PG Zeta commision work WIP part II

Hello guys, after mounting the PG Zeta over an old base and a piece of wood, I started working on the base of the huge kit. The base is pretty much and obviously inspired by Fritz's awesome work on his Sinanju...it is basically a part of a space colony. My base will be weathered and battle damaged though, unlike Fritz's nice clean work on his dio...making it faster to do than adding nice neat details.

Materials:

Read more >>

Friday, December 18, 2009

making simple dios for your Gunpla


Hello guys, I figured posting this simple tutorial here in my blog. I posted this topic last August 2009 in Zero G, my home forum...The bases you could buy for your gundam kits is a bit expensive for me, plus before... Bandai only produces simple bases, unlike now they have the Zeon logos and such as bases...which looks really cool. Anyways, here is a simple tutorial on how I create simple and cheap bases for my gunpla...

Materials you'll be needing...

- piece of wood for the base
- super glue
- epoxy clay
- rod ( clear acrylic, copper rod or stainless rod )
- real sand
- Elmer's wood glue / white glue
- Tamiya enamel paints
- ZIPPO lighter fluid ( cheap thinner for enamel paints )
- cheap acrylic paints used by students( Reeves and such )

 STEP 1: mounting the rod to the wooden base, bore a hole slightly smaller than the rod and superglue it there...then use an epoxy putty to reinforce the rod...


STEP 2:  laying in the groundwork...materials used, sand, pebble, woodglue, old brush and spray can cap...


Then mix evrything in the cup...try to achieve an oatmeal texture, the thicker the texture the faster the drying time...
 
 
Then apply the mixture with an old brush directly on the surface of the base...let it stand / dry overnight...actually it is visibly very obvious once dried...


Here are some battle damage effects done on the Freedom wing... I used soldering iron for the gun holes, my u-shape hasegawa chisel, Tamiya files and ordinary lighter to bend the wings...I also added some wires and internal damages with pla rods and plates...


 I then roughly painted the holes with black gundam marker and painted the edges with silver gundam marker...
 
 Well, that is about it...I will have to create another post on how I paint this with cheap acrylics...but here are some pictures of the finished and painted base...


HERE is the link ( in this site ) of the finished pics:

Read more >>

Featured Post

Vallejo Mecha Color EXPLAINED

As usual, pardon for the selfies as I desperately try to get comfortable in front of the camera, for my new YouTube channel .  Le...

TOP POSTS