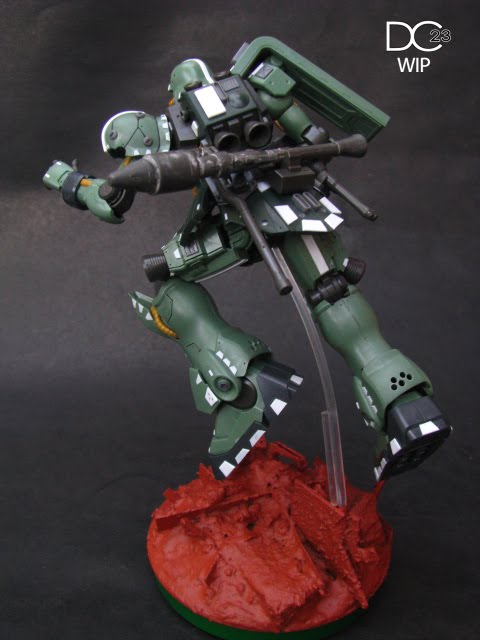
Ello guys, I did a simple base for the hguc Geara Zulu...I wanted the kit in flight mode so I needed to create a base for it. This will also be a mini tutorial for people who likes to build custom bases for their kits.
BTW, I do like those nifty bases by Bandai, specially those with the symbols as the base...but I kinda find them expensive and I am a cheap guy...so I always do custom ones. I might get the Zeon base though just for photo shoots of my dio-less and base-less kits. Anyways here some pics showing how I made my cheap custom base...
Materials used :
Step 1: Mount the clear plastic rod to the tin can lid with an expoxy putty, I suggest you find a clear plastic rod that is not the soft variant you see here...
Step 2 : glue the styropor to the tin can lid, note that both the epoxy putty and the glue does not really bond the materials to the tin can lid...we will remedy this later. Also, force some smaller pieces of styro to the gaps...
Step 3 : spread the clay on top of the styro...we will be using the clay just to position the leftover pla plates. the leftover pla plates will reinforce the clear plastic rod by gluing it with Tamiya thin cement...
Step 4 : now we use my usual Glue + Sand mixture to the whole base...The mixture will harden like rock overnight and will reinforce everything that we have put on the base including the clay...
The photo below showing the base after letting the Glue + Sand mixture cure overnight...
Step 5 : mask the clear rod and the bottom of the tin can lid...then prime, you can paint this after an hour...but I got busy modifying the HTML of this blog, so I was not able to paint it.hihi
It's almost done, you just have to paint this with cheap acrylics like what I usually use and seal with a flat coat...I have here some pics of the hguc Geara Zulu mounted on the base in flight pose. Again, if you could find the hard variant of the clear plastic rod, much better...coz I am not sure how long this soft variant can hold it's shape. Notice in the pics I even added a shorter plastic rod near the base to reinforce the soft rod, hope this would help hold the kit. Sorry for some blurry pics. hihi
Thanks for viewing!


16 comments:
awesome tutorial :D
Thanks bro...I do have better tutorials in the " my tutorials section "....do check them out if you have the time. thanks! ;)
Ah now i know where to use those left over pla plates on already! Thanks for sharing on a simple but very nice base :D
But is the rod able to hold..seems like its bending quite a lot in the photos especially the last one!
hihi...some people who are good in scratch building use those pla plates for reinforcements...I just throw in dios.hihi
Yeap, the rod aint holding...I suggest everyone to use the hard variety not the soft variant I used. I will have to reposition the kit to support the rod with it's foot on the ground or something. oh well lesson learned bro. ;)
Wow! This is very nice, bro. Good! Good! Keep it up! :)
Thanks bro! just a practice build before the AC White Glint. ;)
Great base and model
Thanks bro...I am currently priming the kit right now and might paint the base later.
How do you mount the kit to your plastic rod?
awesome and inspiring tutes dude!
I've learnt heaps from them.
keep 'em rollin.
@ a, there is a hole at the bottom of the kit...i just inserted the 3mm clear plastic rod. Thanks bro. ;)
Did you drill your own hole? what about MG's that come with special peg to attach itself onto the bandai action base?
how would you mount one of these kits to your customised base?
lotsa thanks in advance. I'm really really new at modelling. ^^
This hguc kit has a 3mm hole...but my other MGs, I usually drill my own and simply insert the rods. you could also glue/mount the special peg to the rod which attaches to the MGs. Enjoy the hobby bro. ;)
nice
Thanks poison! XD
Thank you. I find gundam modelers are creative in their own ways. Brings out the art in everyone. ^_^
I think all modelers are creative... Sci Fi modelers are just FREE to do anything with their builds as we are not limited by any realistic rules. We are building unrealistic giant robots afterall. :)
Post a Comment