
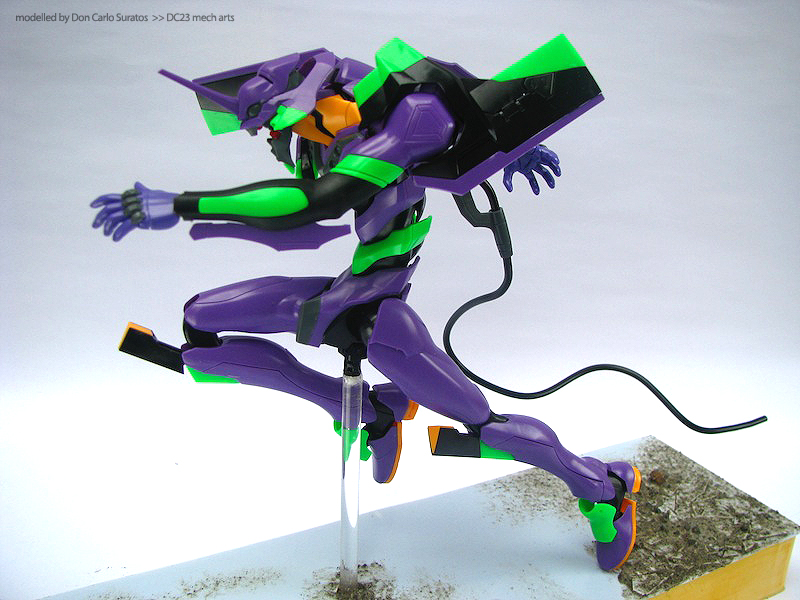
I finished snap fitting this Eva kit last night and I never imagined it will be a bit complicated. I thought I could snap fit this in 2-3 hours, but it actually took me 4-5. This kit is the Evangelion 2.0 You can ( not ) advance 2010 release of the Eva Unit 01.
Bandai did not qualify this as a Master Grade but I think it is almost a master grade in terms of the number of parts and the quality of the build. I did not want to risk the kit falling off my shelf, thus I created a quick base that will hold the kit securely and simulate the running pose from the movie.
I plan to paint this clean and OOTB, maybe give it a gloss coat and paint the base to look like concrete. I already did the damage effects on the concrete floor. My only problem is how to show scale in the dio / base. Maybe I will put a small wrecked 1/200 car or truck or something. I plan to continue with this build after I finally finish my PG MKII commish by end of November.


There are a few extra parts for this kit and it even has an extra head. I think the extra parts is for the berserk mode or something. I did not use the standard parts that was instructed in the manual as I find the extra parts a bit more menacing.
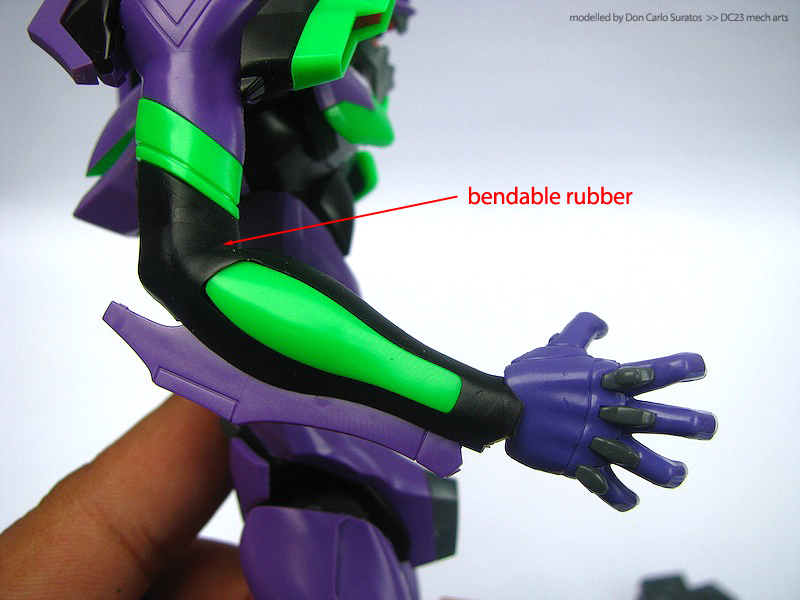
The standard head has a squinting pair of eyes while the one I used has it's eyes wide open. The standard body armor parts are less curvy and smaller. Notice the forearm blade, the one I used has more interesting curves.

The standard head...

The optional head with eyes wide open! very nice and it looks more menacing!


I highly recommend this kit though it is a bit pricey for a non - MG kit. though as I have said it is almost MG - like in terms of the number of parts and the articulation of the kit. I am looking forward to painting this kit after my PG MKII commish.
Thanks for dropping by! Til' next post! :)


.JPG)


.JPG)


12 comments:
hope to see this in action... :D
Just a relax build bro... nothing fancy, though I revised the pose and heated the clear rod to bend it forward and make it look more dynamic. :)
the sprint pose is great bro.
Thanks buddy, it's better now... I just revised it bro. :)
how to show scale? put trees or miniature bridge in the dio. buildings toppled over by the the arms. :)
Thanks, but I think is just wide enough to serve as a road or something, will look into my options. :)
the motion's super lively. I'm not sure how hard it'd be to do this, but it'd be amazing if you can actually bend the toe area slightly for the foot that contacts with the floor.
thanks! will see what I can do with the foot. ;)
wow nc 1 sir don :)
I will paint it by next month. ;)
guys i lost the little piece that goes on the chin. the little green 1 any chance of getting it back ?
Thank you for your wonderful article! It has been very helpful. I hope that you’ll continue posting your knowledge with us.
Post a Comment