Search This Blog

DC23 Clothing

DC23 Clothing
Find Us At Facebook
Showing posts with label 1/35. Show all posts

Thursday, February 13, 2014

DC23 Mecharts Gallery Updated


verDC23photo

It has been so long since I had the time and the mood to update my gallery. Just added the links  of a couple of finished or completed builds last year ( 2013 ). 

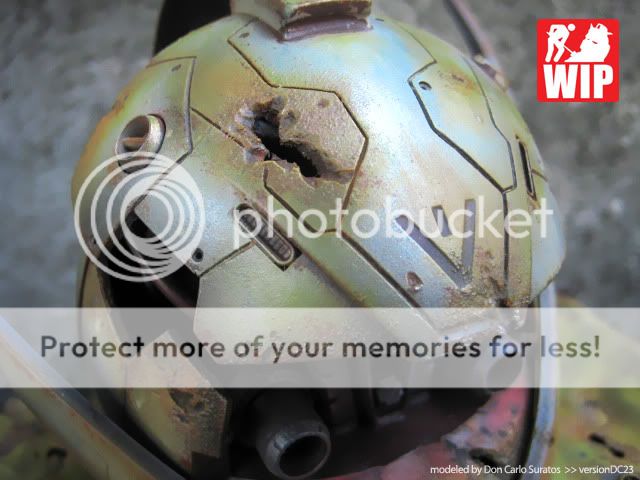
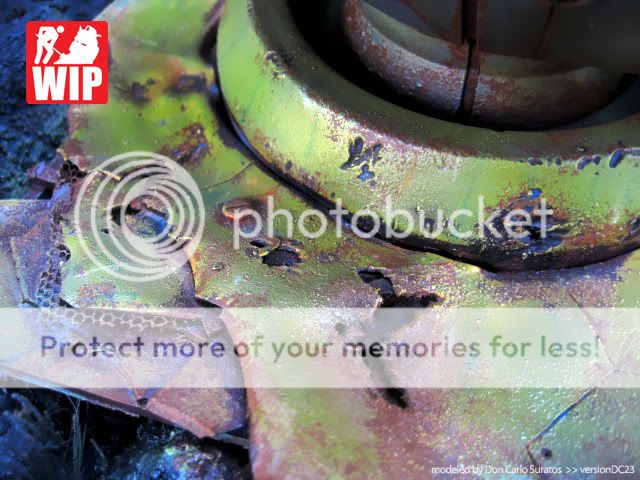
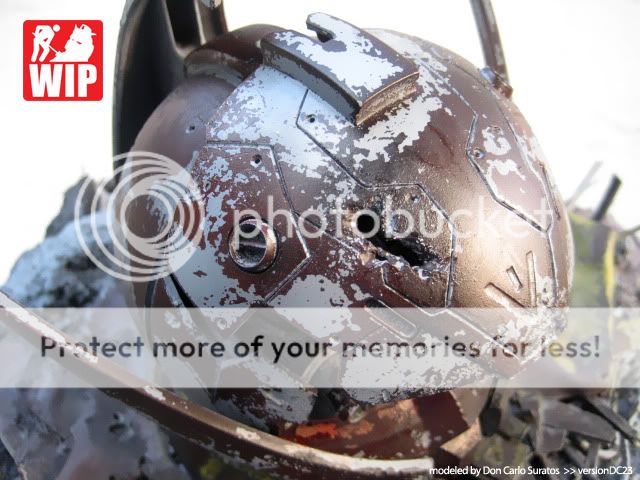
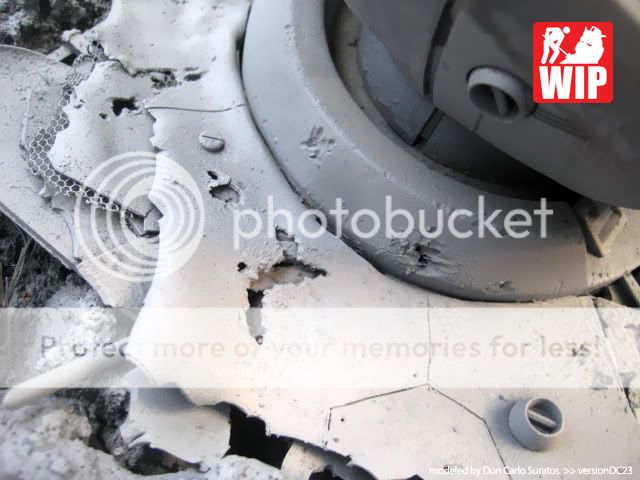
The Ironman 12 inch statue I did for a friend which was basically a repaint of a statue last year was a fun build. I added the damages and paint chips and enhanced the overall finish of the statue / toy. A super fun quick build that ended up nicely.

I also added a link of my only painted kit last year, which was a beautiful Ma.K kit given to me by my old friend Kenny Lim aka TOYMAKER back in 2009. The kit has a bit of fitting issues but I did had so much fun hand painting the floral stuff on the kit. This kit is one of my fav display in my office desk these days. 

Anyways, do check them out in the links below...

 Gallery

 Commission Gallery

Thanks for dropping by! Until next post guys! Just enjoy the hobby! :)
Read more >>

Wednesday, February 12, 2014

Ebasenet Gundam Head Display Groupbuild Gallery


I am trying to catch up with what are the ins and outs of the Gunpla Community for the past few hours and I just saw that the Ebasenet Gundam Head Display Groupbuild Gallery has now been set up! It is such an honor to be in the Ebasenet website! Thank You Masters!

I know this is old news already, but I have been away for a while and have been inactive in forums and the community for such a looooooong time already. Obviously I was inactive already before this gallery has been set up by the Gunpla masters of Ebasenet

Construction of my house should be done by the end of the month ( February ) and I am slowly getting excited in setting up a corner for this wonderful hobby! Will check my old tools if they are still in working condition and will get supplies for my first build very soon! Can't wait to get back!

Below is the link of my own gallery at Ebasenet... Do check it out if you have the time. :b 

Turn A head diorama verDC23 @ Ebasenet

Pardon for wasting your time! Just got really excited after seeing the gallery of my Turn V Gundam at Ebasenet. Thanks for dropping by! Until a better post guys! Just enjoy the hobby! 


Read more >>

Wednesday, May 4, 2011

1/35 Gundam WZC Resin - initial leg sculpts


Pinoy Resin Photo

I have here some photos of our 1/35 Gundam Wing Zero Custom resin garage kit. These photos are the initial sculpts of the internals of the project. Apparently we are going for a fix pose but with internals, thus all the armor parts can be painted separately and will attach to a sturdy highly detailed internal.

These sculpts are practically copied from the Bandai mastergrade and scaled up to 1/35. However as it is only the sculptors initial sculpt, we will still add details to the internals as need be and also modify it a bit.  These are basically just the base design of the internals.

For previous updates and more details on this project, here is the link to the original thread by Alex Arevalo aka Oceansean at our MAC Forums...
1/35 Gundam WZC Resin Project by Oceansean

Pinoy Resin Photo

Pinoy Resin Photo

Pinoy Resin Photo

Pinoy Resin Photo

Pinoy Resin Photo

Pinoy Resin Photo

Thanks for dropping by! Til next update! :)


Read more >>

Tuesday, April 12, 2011

New color accurate photos of my Turn A head diorama!


Although I think I have enough photoshop skills to correct the colors of the old photos, I decided to take new photos today instead. The old photos were shot outdoors under extreme and harsh 12 noon lighting producing some harsh over saturated colors. Thus I took the new photos under the shade of the sun at around 3 pm today to have more color accurate images.

The colors are ultra accurate from what you will see if you get to see this diorama in person. The blues are less vibrant and the pastel work looks like it blended better in the new photos.  Anyways I have deleted the old images and replaced them with the new ones. The photo below shows how harsh the colors of the old images are. 

Now here is the link to my gallery again - 1/35 Turn A head diorama


Thanks for dropping by! Til' next update! :)


Read more >>

Saturday, April 2, 2011

Ebasenet Head GB - 1/35 Turn A head diorama


GundamDioramaPhoto


Just finished my entry for the Ebasenet head display GB held at ZeroGunz. I chose to add a diorama / scene for the head as I originally planned it as my entry for the ZeroGunz Weathering GB. But after WhiteBase announced the head GB at ZeroGunz, I just had to use it for the head GB instead.

This was a fun weekday ( 2 hours a day ) project. I learned a few weathering tricks throughout the build and it was my first time to paint some 1/35 military figures. I painted the details ( flesh, white and black ) of the figures with Citadel paints and it worked like a charm!

The citadel dries flat and fast and it is easy not to produce brushstrokes on such small details. I also made a lot of booboos during the build. Mainly I was not able to achieve the overall look that I was aiming for. Which is the Turn A seemingly submerged form chest down on the cliff side. I eventually came up with the look that the Turn A bust was ripped off from the body and is sitting atop a cliff.

The most notable booboo is using white to dry brush the military figures as it created too much contrast with the black parts. The white also made the figures look glossy in the photos as the highlights are in white. The harsh 12 noon lighting also contributed to the glossy look of the figures.

Anyways, I enjoyed this very relaxing build and should do another 1/35 scale diorama one of these days. Now here are a ton of photos of my most recent diorama...
Read more >>

Wednesday, March 23, 2011

Ebasenet Head GB - Turn A WIP Summary


I thought of putting up a summary post of my Turn A head WIP as all of the WIP posts are scattered all over my blog. My last WIP update shows that the project is almost done although I still have to detail paint the figures and do some pastel work on the head to complete it.

I bought this Turn A in one of the Toy conventions here in the Philippines and it is a coin bank. I then thought of adding details to it and used the MG G-Fighter as the neck / upper torso part. Then the Ebasenet GB was announced at ZeroGunz and I thought of using it as my entry. Although I have started on the project a bit, Whitebase allowed me to enter it for their GB.

I then decided to set up a simple base for the head and make it look like it was totally damaged and dead already. I then added some out of scale 1/35 figures to give life to the whole set up. The base of the neck is scratch built with some pla plates and it is painted with Tamiya acrylics.

Weathering was done with Mungyo pastels, Tamiya enamels, Citadel acrylic paints, and Tamiya weathering master. Anyways, here are some photos showing the whole progress of the build...


Thanks for dropping by! Til' next post! :)


Read more >>

Tuesday, March 22, 2011

Ebasenet Head GB - Turn A last WIP update


Almost done! This is my entry for the Ebasenet / ZeroGunz Head Group Build and I managed to almost finish it last night. In comparison to the previous update, The overall color of the Turn A head is a bit warmer and rustic looking. I basically added more washes to the head and used the RED Future variant as the overall flat top coat.

The Red Future ( Pledge Wipe and Shine ) acts as a very soft filter as it is a light clear red in color. It blended all the weathering effects added to the kit thus giving it a more realistic look. The ground work was painted with my airbrush and a lighter tone of the groundwork was also sprayed around the edges of the Turn A head to serve as dust effects.

I also painted the soldiers in Tamiya acrylics and will have to paint all the details with a fine brush. I decided to give the figures a blue uniform as khaki and greens are too realistic to me. Hopefully the blue uniforms will give the whole diorama a more SCI FI look.

Enamel washes around the corners of the groundwork, pastel work on the Turn A head and detail painting of the figures will complete this build. This will be the last WIP update for this build and hope to finish this soon. Anyways here are some snapshots of the progress so far...


Thanks for dropping by! Til' next post! :)


Read more >>

Sunday, March 20, 2011

Turn A head WIP - initial painting & weathering


I managed to paint the base colors of the head yesterday and was also able to do the initial weathering. I painted this with Tamiya acrylics, added a one color paint chipping with a sponge, gave it a couple of enamel washes, applied some Tamiya weathering master colors and some Mungyo pastel streaks.

I do not have some oil paints for the spot washing and I also need a couple of citadels to actually finish this head. I managed to apply some sort of streaks ( the blue ones are very noticeable ) with my Mungyo pastels replicating the effects of spot washing somehow.

The Tamiya weathering master rust color is sticking out like a sore thumb, so I need to blend everything in with some Tamiya smoke post shading later. Another darker color of paint chipping, some spot washing with oil paints, and a bit of dry brushing on the internal parts would complete the weathering of this piece.

The photos shows a slight irritating sheen ( semi gloss ) finish to the kit thus it looks like unpainted plastic with weathering. I will be giving this a better flat finish before the final pastel work though. I have to put this aside now as I will resume work on the MG Zeta commish for the next couple of days. Updates on that build very soon. Anyways here are a few snapshots of the Turn A progress so far...


Thanks for dropping by! Til' next update! ;)


Read more >>

Saturday, March 19, 2011

Turn A head painting - EPIC FAIL!


The painting of the Turn A was an absolute epic failure! I tried the Hairspray Technique to produce some nice effects and because I did not add salt on the corners, the overall paint chipping effect was too much. I basically came up with a totally rusted head.
As much as I want this to be heavily weathered, the results of the painting was way too much for the effect I was trying to achieve. I also added some cast iron textures before the painting. The texture won't be cast iron but I figured that because of the scale of the build, I do have to put more evident textures for the rust painting later.
You do not want rust over a silky smooth surface do you? I think the paint chipping failure and the cast iron texture will both give the head some interesting textures for the weathering later. I do not like to come up with a weathered build with rust over a smooth surface. Doing weathering on a smooth textureless surface would result to an unpainted BUT weathered look.
I then re-primed the kit and then eventually painted it flat black as the base color for the airbrushing soon.   I like using flat black as base color as the hard to reach crevices would remain black and I won't really need to bother painting them. Anyways here are more photos of the progress so far...


Thanks for dropping by! Til' next update! :)


Read more >>

Featured Post

Vallejo Mecha Color EXPLAINED

As usual, pardon for the selfies as I desperately try to get comfortable in front of the camera, for my new YouTube channel .  Le...

TOP POSTS