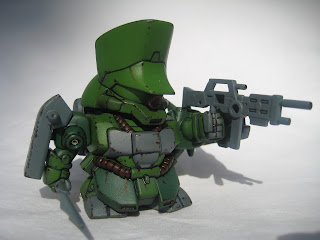
I got this kit dirt cheap at around 2 US dollars back in HK 2008...I worked on it the first day of 2009 and was a one day event...I removed the seam lines with cement in the morning...sanded the kit around 2 pm...primed the kit around 4 pm...airbrushed the kit after dinner...and added panel lines and weathering at around 9 pm. This was a pretty fun build, I plan to do this every after a heavy modding project ( usually for competitions ). Hope you enjoy my weathered Doga. thanks. :)

Search This Blog
LABELS
Subscribe to:
Post Comments (Atom)
Featured Post
Vallejo Mecha Color EXPLAINED
As usual, pardon for the selfies as I desperately try to get comfortable in front of the camera, for my new YouTube channel . Le...
TOP POSTS
-
It has been a while since I did a " tutorial " post as I have only been doing miniature painting for only a few months. I fee...
-
I just finished painting and taking photos of this 12" Kratos action figure . I will give this to my client / officemate today an...
-
Clown image from www.likecool.com Although I have been focused on promoting our forums and our members' contributions here in m...
-
As always, I do not claim expertise in this hobby but I just want to share my steps on how I build my kits. I thought of this coz I get ...
-
Once again, pardon for all the iPad Pro selfies, as I really need to get comfortable in front of the camera for my new Youtube channe...
-
I felt I have to put up a quick tutorial on how to paint the small pilot figures that come with most Bandai Gundam model kits. To...
-
Ello guys, I was snapfitting the Armored Core White Glint since 12 noon today, basically 5 hours already...so I got tired now. The kit is r...
-
As usual, pardon for the selfies as I desperately try to get comfortable in front of the camera, for my new YouTube channel . Le...
-
I am having reservations and second thoughts of actually putting this up as a tutorial as it is too simple and it was kind of an experiment...
No comments:
Post a Comment