Search This Blog

DC23 Clothing

DC23 Clothing
Find Us At Facebook
Showing posts with label toy painting. Show all posts

Thursday, January 2, 2020

HOW TO Paint a Zoids Gusock at Youtube


HOW to Paint A Zoids Gusock & HAPPY NEW YEAR photo


I just uploaded my recent video ( I think just my 23rd video ) at my 4 week old Youtube channel. 

The video above is the complete painting process of a quick fun project of a Takara Tomy Zoids Gusock, painted with Vallejo Mecha Colors and other Vallejo Paints. ALL with Vallejo Acrylics as usual. 

This was just a quick "demo" project painting with Vallejo mecha Colors. Although I love my Vallejos for a while now, I am really amaze on how strong the Mecha Color paints are. Although I am very bias, you will see in the videos how I handle ( mishandle ) the pieces even during painting. 

The adherence of these Mecha Color paints are insane even without curing time ( drying time is different than curing time ). 

I used to paint with Vallejo Game and Game Airs, also with Vallejo Premiums... which have strong adherence too. but I let those paints cure for a week before handling. Before playing or before posing ( Gunpla ). The Vallejo Mecha Colors should need a nice curing time, but I do not notice it. They dry fast and with really strong adherence to the material ( plastics ), even on a moving Zoids toy. 

Crazy stuff to be honest. 

I did not even varnish ( Mecha Color Matt Varnish ) the armor parts of this Gusock. 

I find the colors ( color selection ) of the Vallejo Mecha Colors a bit limited ( as of now ), but nothing a good filtering or mixing won't fix. 


CONCLUSION

I love my Vallejo Mecha Colors. LOL


HAPPY 2020 EVERYONE!

I plan to blog ( ramble ) everyday this year. Nothing important, just my way of sort of converting this blog, into a diary of a full time professional scale modeler. 

People specially the younger ones, might be curious how it is to be a full time artist / modeler in the third world. 

Anyways, I was sooooooo tired a couple of days ago ( December 31 ) and yesterday ( January 1, 2020 ), as I migrated from my little corner at the ground floor of my art studio ( Blue Brick Art ), to my old work area at the second floor. 

Imagine climbing up and down a staircase with Gunpla stuff the whole day, and painting the walls the next day. 

I was crazy tired I failed to blog on the first day. But it was worth it!

A couple of days of NO modeling or painting was not very fun, but the logos of Vallejo, my logo and my eldest daughter's on the big white wall turned out nice. It is not perfect as it was hand painted ( with Vallejo Acrylic Studio of course ), but it really turned out nice.

I will have to retouch some errors and blemishes next time. But pretty happy with the logos so far.

I will need to invest on a nice glass cabinet ( 8 feet wide and 4 feet tall ) for all my painted builds this year. I will be painting like a madman this 2020, I am sure I need more cabinets than this area can hold. But a nice 4 x 8 feet at the back of my Gunpla area would be a nice start. 

Anyways, a ton of painting and Youtube Videos this year ( and beyond ). 

Thanks as always for dropping by! Just enjoy the hobby guys! 

Saludos! 


HOW to Paint A Zoids Gusock & HAPPY NEW YEAR photo

HOW to Paint A Zoids Gusock & HAPPY NEW YEAR photo

Read more >>

Friday, December 20, 2019

Weathering Without Painting a Rubber Zaku Figure


Weathering Without Painting a Rubber Zaku Figure Photo

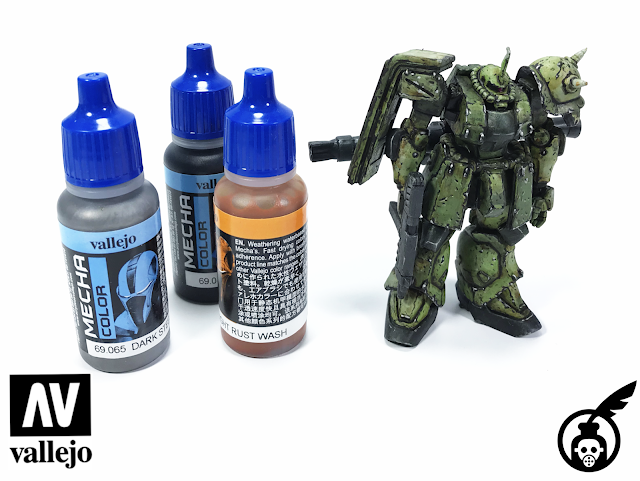
Just finished this quick weathering project. This project was basically a test, a sort of experiment that you can paint the Vallejo Mecha Colors on kits and figures ( any model surface ), even without priming. And that the paints when dry, will even look like the material of the kit / figure. 

Vallejo also claims that the Mecha Color range were formulated to withstand regular handling and wear and tear of articulated kits like Kotobukiya, Gunpla, StarWars, Transformers and the like.

So I tested the paints! 

I weathered this rubber ( rubber plastic of some sort ) Zaku figure without priming and painting the base colors. I used a ton of Vallejo Mecha Color Paints, but you could reduce the painting to around 8 to 10 colors. I really have to practice painting with sets of 6 to 8 colors ( limited palette ), so that I could share it with other modelers easier. 


MECHA COLORS
  • Mecha Color Light Green
  • Mecha Color Green
  • Mecha Color Dark Green
  • Mecha Color Pure Black
  • Mecha Color Grey Sand
  • Mecha Color Chipping Brown

WEATHERING WASHES & INKS
  • Mecha Weathering Black Wash
  • Mecha Weathering Eng Soot Wash
  • Mecha Weathering Dark Rust Wash
  • Mecha Weathering Light Rust Wash
  • Mecha Weathering Oil Earth Wash
  • Game Ink Yellow
  • Game Ink Green

MECHA COLOR METALLICS
  • Mecha Color Light Steel
  • Mecha Color Dark Steel
  • Mecha Color Copper

MECHA FLOURESCENT 
  • Magenta Flourescent 

AUXILLIARY 
  • Mecha Color Gloss Varnish
  • Mecha Color Matt Varnish
  • Retarder Medium
  • Airbrush Thinner
  • Flow Improver
  • Distilled Water


MY VALLEJO COLORS WEATHERING PROCESS ( in summary )
  1. Hand paint Matt Varnish ( 3 thin coats )
  2. Paint lighter colors with Mecha Color Light Green and Green 
  3. Dry brush Light Green
  4. Paint shadows with Dark Green
  5. Paint the chipping with Mecha Color Chipping Brown
  6. Hand paint Gloss Varnish ( 3 thin coats )
  7. Apply Mecha Weathering Washes in varying ratios
  8. Filtering with Game Ink Yellow & Green
  9. Hand paint Matt Varnish ( 3 thin coats )
  10. Paint Pure Black on details, then Metallics
  11. Paint Flo color ( mono eye )
  12. Paint rain streaks and armor stains with washes


Asmuch as I want to talk you through in detail. I think it is easier to just watch my Youtube video below. Saludos! 


CONCLUSION

The Mecha Color Varnishes are CRAZY GOOD!


Weathering Without Painting a Rubber Zaku Figure Photo

Weathering Without Painting a Rubber Zaku Figure Photo

Weathering Without Painting a Rubber Zaku Figure Photo

Weathering Without Painting a Rubber Zaku Figure Photo

Weathering Without Painting a Rubber Zaku Figure Photo

Weathering Without Painting a Rubber Zaku Figure Photo


Read more >>

Saturday, January 17, 2015

Heroclix DOTA 2 TideHunter verDC23


Heroclix DOTA 2 TideHunter verDC23

It took me a while to finish this commissioned work of a Heroclix DOTA 2 TideHunter figure as I had to wait for my "Kolinsky" brushes for hand painting I bought online. One of the secrets in hand painting with  acrylic paints ( Vallejos ) are the brushes! Crappy cheap synthetic brushes will deteriorate fast as the acrylic paints will eat up those plastic bristles during hand painting. " Kolinsky " or at least Red Sable brushes are a must!

Anyways, this little toy was made a little bit more interesting by removing the Heroclix base and re-painting it. This is fully hand painted with Vallejo Model Color paints, Vallejo Water Effects and sealed with Vallejo ( Resin ) Gloss Varnish. I tried my best to add details thru painting but the sculpt of the toy is just not as detailed as real plastic, resin or white metal miniatures.

It took me a couple of days ( maybe even 3 days ) to achieve the look of the custom base as I had to apply around 4 or 5 heavy coats of Vallejo Water Effects paints and let cure for at least 12 hours. Anyways this was a fun little project fully hand painted with my Vallejos. Thanks as always for dropping by! Until next completed build guys! Just enjoy the hobby! :)

Before re-painting photo below taken from - realminis.blogspot.com

Heroclix DOTA 2 TideHunter verDC23

Heroclix DOTA 2 TideHunter verDC23

Heroclix DOTA 2 TideHunter verDC23

Heroclix DOTA 2 TideHunter verDC23

Heroclix DOTA 2 TideHunter verDC23

Heroclix DOTA 2 TideHunter verDC23

Heroclix DOTA 2 TideHunter verDC23

Heroclix DOTA 2 TideHunter verDC23

Heroclix DOTA 2 TideHunter verDC23

Heroclix DOTA 2 TideHunter verDC23

Heroclix DOTA 2 TideHunter verDC23

Heroclix DOTA 2 TideHunter verDC23
Read more >>

Sunday, April 7, 2013

Ironman before painting

Figured I'd share some photos of the Ironman 12 inch figure after fixing the left knee and ankle parts. I got the figure drooping forwards and is not standing straight up but after some green stuff and super glue, the pose finally held up.

The photo of the figure in my workbench shows how bad the drooping was before the fix up. The following photos shows that it is standing pretty straight now that the green stuff specially on the knee parts has cured.

Anyways, here are some photos before the battle damage painting and weathering...


Read more >>

Ironman statue in progress

I thought I will go straight to painting this handsome Ironman statue, apparently I had to fix the pose a bit as it is not standing straight.

The figure is made of fairly soft white rubber. And due to the stress of the weight of the torso, the legs and ankle parts loosened up and it cannot hold a straight pose.

I had to reglue the ankle part and the left leg knee part and reinforce it with green stuff. The green stuff will harden much like the material of the figure and should help in maintaining a straight pose.

I also had to disassemble all the parts of the figure so that I could clean up those hard to reach areas in between the connecting pieces.

Once the green stuff hardens in an hour or so, I will then start to do battle damage painting on this lovely figure. As always I will be sealing all the painting with wipe and shine soon.

Stay tuned guys as I try to improve this already handsome figure. :)


Read more >>

Featured Post

Vallejo Mecha Color EXPLAINED

As usual, pardon for the selfies as I desperately try to get comfortable in front of the camera, for my new YouTube channel .  Le...

TOP POSTS